Monthly Archives:

December 2014

Anamorphic

Anamorphic on a Budget – Chapter IIIC

December 17, 2014

< < BACK TO CHAPTER IIIB - ISCORAMAS (1.5X)

DISCLAIMER: This article was written way before the announcement of the FM system. I haven’t had time to study it properly, so some information here is probably outdated already.

C – DOUBLE FOCUS (2X)

Entry point for many anamorphic users, these lenses are cheaper because they present a lot of challenges to work with. All of them are projection lenses, have an awesome 2x stretch, and placed on top of a taking lens. As they’re projection lenses – and the screen is NEVER close to the projection booth – it’s quite common that their minimum focus ranges between 6 to 9m.

The name of the chapter already introduces on of their challenges: double focus. In order to have a focused image it’s required to focus both the taking lens and the anamorphic block to the very exact distance. If one of them is slightly off, image quality degrades quickly.

Taking this into account, it’s easy to figure that camera movements and rack focusing are very complex operations to be executed during a single shot. The shooting style has to fit the lenses.

It’s a practical thing to split them in two main categories: 35mm projector lenses – large, heavy and, sometimes, colorful – and smaller projector lenses, like 8mm or 16mm, used in airplanes, military applications or film clubs.

The 35mm anamorphic projector lenses are still in production by Schneider Optics. There are vintage models made by Sankor, Bausch & Lomb, Carl Zeiss e Möller. Their main advantages are high image quality and sharness from edge to edge of the frame. Because of their minimum focus distance, diopters – close-up lenses – are essential extras to use these lenses in narrative films (6m to achieve focus is pretty far for anything with a low budget). Besides, due to their weight, a proper support system is required.

The taking lens has to be considerably longer than the ones used in the previous examples, 85mm is the widest you can go on a full frame sensor to avoid side vignetting. When converting the focal length, this comes close to a 45mm on the horizontal axis.


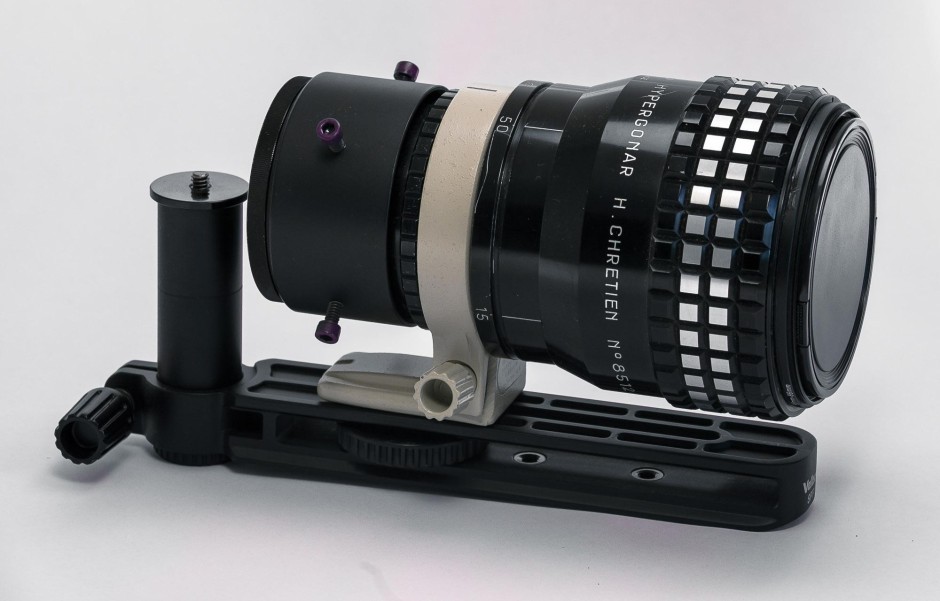
Henri Chrètien Hypergonar Hi-Fi 2 and its support system.

Another obstacle: none of these lenses have filter threads, preventing proper use of diopters to improve minimum focus. Some have clamps to hold filters, but in most of them we have to improvise a solution, like the Hypergonar Hi-Fi 2, to which I glued a 95-86mm step down ring to the front of the lens, allowing the use of filters with both diameters.


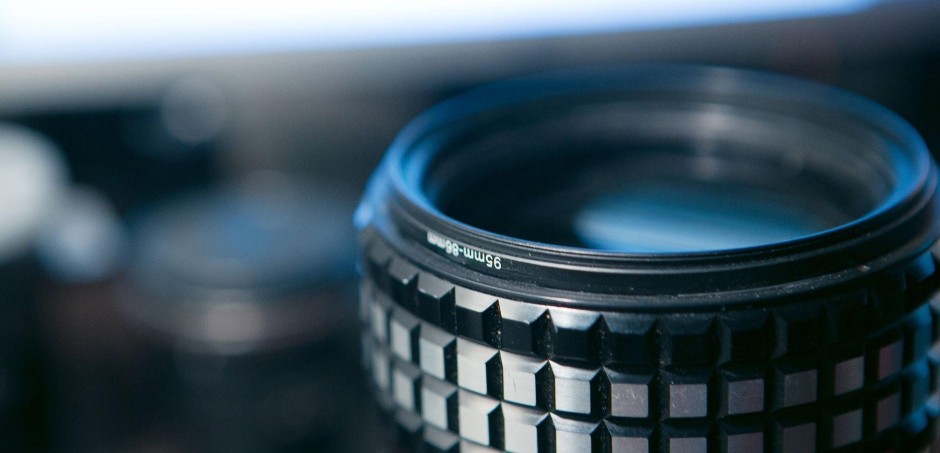
95-86mm step down ring glued to the front of the Hypergonar Hi-Fi 2.

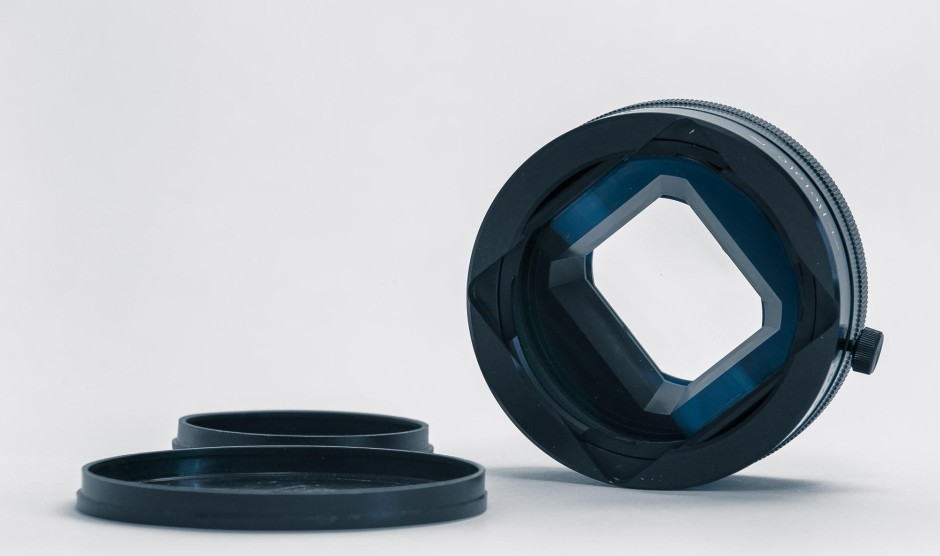
Now getting to the more interesting part of this chapter: lenses for smaller projectors. Manufactured almost exclusively in Japan by Kowa and Sankor during 1970-80 and shipped out to the whole world, these lenses come in different shapes and sizes but they mechanism and performance are almost identical. Minimum focus is set at 1.5m and properly designed clamps and rings to attach filters onto either Kowa or Sankor.

The most wanted versions are Kowa 8-Z and Sankor 16-D that used to be the high end versions of the smaller ones. It’s quite common to find these very same lenses with different labels – Eiki, Elmo, Vidoscope, D.O. Industries, Singer, the list keeps going – but their manufacturer was always the same, it’s just the name that changes.


Sankor 16-D plus clamps and accessories.

The 2x stretch makes the anamorphic bokeh very pronounced when using these lenses, but 16:9 video ends up with a ludicrous 3.56:1 proportion – a little image strip in the middle of a black screen. The best workaround for this issue is to shoot 4:3 as RED cameras in Anamorphic mode, or the Alexa 4:3, Canon DSLRs through Magic Lantern and, even more recently, the Panasonic GH4. This way the resulting image has a 2.66:1 aspect ratio.


Strong anamorphic flares and bokeh.

One of the differences between 35mm projector adapters and the smaller ones is the coating used on the glass. The 35mm ones are multi-coated since they’re modern lenses and this kills the anamorphic flares. On the other hand, the smaller ones are single-coated and present warm orange flares that can’t be achieved by any other way.

One of the most dreaded features introduced by projection lenses are the “anamorphic mumps” which first came to sight when Hollywood started using anamorphics and it’s still a common feature among the vintage models. David Bordwell explains it way better than I ever could:

“(…) the ‘squeeze ratio’ of Chrétien’s lens design varied across the horizontal axis. These optical tics created distortions and patches of soft focus. The most embarrassing flaw, created by faults in magnification and the uneven compression of the visual field, made central figures look oddly bloated. In close ups, the result was ‘CinemaScope mumps’. Not all of the films were shot with Bausch & Lomb lenses, but other brands of anamorphic lenses tended to cause the same problems.” (BORDWELL, 2007, p.288)

As Bordwell describes, the cause of this quirk is the uneven glass curvature related that creates the stretch factor. Around the edges of the lens the compression is stronger while in the middle the image tends to be more spherical-like. Stretch is not constant across the horizontal axis and also changes according to the focus distance. For objects that are further away, closer to infinity, stretch is 2x, but when the subjects come closer to the lens, this number can go as low as 1.7x. When this footage is stretched back to its “proper” aspect ratio whatever subject is in the center of the frame becomes wider than the real world version of itself, thus creating mumps.


Mumps on a close up shot using a 135mm taking lens + Kowa for Bell & Howell.

There are also exceptions and special cases, as double focus lenses with 1.5x stretch, designed for amateur 8mm and 16mm cameras, such as Bolex-Möller or Yashicascope. Because of their size, they’ve been kindly named baby anamorphics. As they exist in smaller numbers and from different manufacturers their optical quality vary greatly.

Taking these exceptions into account, the few double focus adapters that can be compared to Iscoramas, when it comes to image quality, are Kowa for Bell and Howell and the Bolex-Möller. The first ones, from Japan, were made specifically for an european projector company (Bell & Howell) that demanded extensive quality tests, so this brand of Kowas can be set apart from the other ones.


Kowa for Bell & Howell with Redstan clamps.

Bolex-Möller are germans and, as the name indicates, they come from a partnership between the camera maker Bolex and Möller optics, which means these are lenses for shooting, not projecting. Their minimum focus is at 0.5m. There are two different versions of Bolex-Möllers: one for 8mm and the other for 16mm, considerably bigger. After a while, the partnership ended, but Möller still made some more anamorphics on their own. Even though the markings are different (they don’t say “Bolex” anymore), the optical quality is identical.


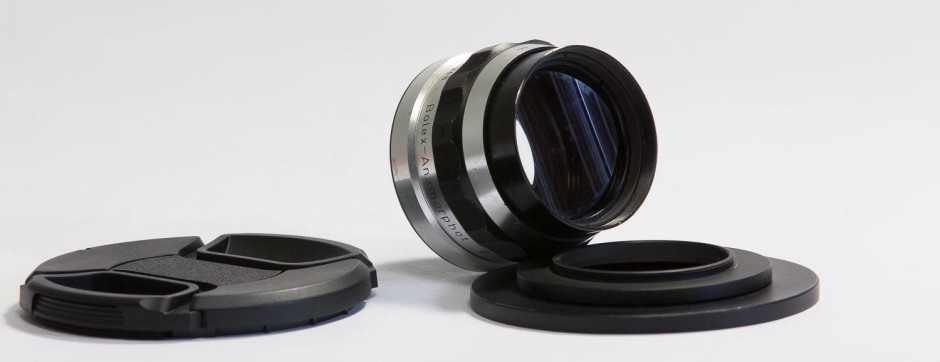
Bolex-Möller 8/19/1.5x.

2x stretch is only achievable through thicker glass elements. Because of this extra thickness, another problem comes to life: while using DSLRs, depth of field can be so short that it doesn’t cover the whole thickness of the anamorphic glass. In this situation, the center of the image is in focus, but there’s a mismatch between vertical and horizontal fields on the edges of the frame, reducing image quality.

Taking this into account, in order to shoot good quality footage it’s better to work with smaller apertures which grant enough depth of field to cover not only the center of the adapter. Apertures between f/4-5.6 tend to have great results. The issue makes it harder for this kind of lens to have decent performance while shooting in low light conditions.

PROS:
– Very strong anamorphic bokeh;
– Lower prices than the other anamorphic adapters;
– Minimum focus between 0.5m and 1.5m (for older lenses);
– Strong flares (for older lenses);
– Great image quality from edge to edge (for modern lenses).

CONS:
– Double focus: it’s necessary to focus both the taking lens and the anamorphic at the same distance so the image is sharp in the camera;
– Too big and heavy (for modern lenses);
– No filter threads;
– Minimum focus is too far (for modern lenses);
– Taking lens aperture must be between f/4-5.6 for better performance;
– Camera must be fixed because racking focus is a nightmare;
– Mumps and distortions across the frame;
– 3.56:1 aspect ratio, way too wide for anything practical.

TO CHAPTER IIID – CINEMA LENS (2x) >>

Hovering Lights

Instagram Encoding.

December 16, 2014

When I decided to go Instagram all the way I haven’t thought about technical specs for even a second. I created my account and started to upload random things in there – at least one picture a day – and for today I thought of trying to upload a short video, stop motion style. Edited the thing together in After Effects, rendered and tried uploading. Got an error saying “the type of video you’re uploading is not compatible with Instagram”. Ok, nice. How do I get a compatible one, then? Why isn’t this thing like YouTube, that you can send whatever you like and the conversion fixes all the issues? Would be too easy, I guess.

It wasn’t hard finding the proper specs for Instagram, though. Weirdly enough, the only way I got it to work was rendering through Premiere. Any file that came out straight from After Effects was “incompatible”. So, for the record, these are the output specs for Instagram:

VIDEO: H.264 format, 640×640 pixels, Square Pixels, 29.97fps.
AUDIO: AAC, 44.100 Hz Mono 64kbps


Pretty low quality for both video and specially audio (mono, seriously?), also, the 29.97 frame rate was an unpleasant surprise.

Just in case, I’m adding a download link for it here so you just need to import the preset back to Adobe Media Encoder and be on your way.

Anamorphic

Anamorphic on a Budget – Chapter IIIB

December 16, 2014

< < BACK TO CHAPTER IIIA - FOCUS THROUGH (1.33X)

B – ISCORAMAS (1.5X)

Back in 2009, an Iscorama could be bought for little over a hundred bucks. Currently their price ranges between US$2500 and US$3500. It takes a lot of effort, patience and time to get better deals.

Iscoramas were made between 1970 and 1980, by ISCO Optics of Göttingen, in Germany, and work in a unique way. They’re adapters – in the sense that they fit in front of a spherical taking lens – and their high prices come from a great number of qualities. There are three main models, 36, 42 and 54, and their names come from the diameter of the rear anamorphic element. The weight difference between the three is drastic. While the 36 weighs around 400g, the Iscorama 54 goes over 1kg.

Stretch factor is 1.5x, which leads to an aspect ratio of 2.66:1, slightly wider than the CinemaScope standard. The widest one can go using an Iscorama on a full frame sensor in order to avoid vignetting is 50mm. Anything longer than that is safe.

Differently from focus through and double focus systems, which have improved performance between f/4-5.6, Iscoramas shoot properly focused images no matter what’s the aperture on the taking lens. Their sharpness is very very high.

Their biggest quality: all focusing is done based on the Iscorama’s focus markings, which is very accurate. The process consists in focusing the taking lens up to infinity and then working with the Iscorama, which has a minimum focus of 2m. It’s exactly the same thing as shooting with a regular lens, but keeping all the advantages of the anamorphic format. The way its focusing works is patented, which has never been bypassed, so these are the only adapters with single focus.

A couple of years after their original release, ISCO noticed that their adapters were being used paired with other lenses than the standard 50mm that came with it, so they took this chance to improve the glass and release them as individual pieces, without a default taking lens. That’s when the Iscoramas 36, 42 and 54 were born. They’re more modern and multi-coated, so less prone to flaring.

These lenses were designed for photography – not solely projection – and so they have standard filter threads (72mm, 82mm and 95mm for Iscoramas 36, 42 and 54 respectively), besides killing the need for special clamps on the rear element as well, since they also have regular filter threads (49mm, 62mm and 77mm respectively).


Iscoramas 36 and 54, Iscomorphot 8/1.5x and Isco Widescreen 2000.

Their mechanism to align the stretch is also simplified, directly on the lens through the use of side buttons that must be pushed in so the user can spin and align the stretch axis.

As any other anamorphics, Iscoramas also have their exceptions. The first of them is the Iscomorphot – also known as baby Iscorama -, a version for 8mm movie cameras which shares the same optics as its bigger brothers: focusing done only on the Iscomorphot and taking lens set to infinity. This little gem can focus down to 0.5m without diopters, but its image has very little sharpness and contrast, with reasonable results from f/5.6 or smaller apertures. Combined with APS-C sensors, it’s vignette free from 60mm on. Doesn’t work well with full frame cameras.


Iscomorphots 8/1.5x duo.

The second exception to the Iscorama family is the Isco Widescreen 2000, which works just as a focus through adapter with improved optics and 1.5x stretch. With this one, focusing is done on the taking lens and the adapter is also fixed between 4m and infinity, requiring diopters for closer shots. It was used as a projection lens, so needs clamps and mods in order to provide regular filter threads.


Isco Widescreen 2000 and accessories.

Not taking these two exceptions into account, here goes the pros and cons list for the Iscoramas:

PROS:
Single focus: patented design, focusing is done only on the Iscorama;
– Simplified aligning process;
– No need for clamps;
– Strong flares (only with the Original Iscorama);
– Anamorphic bokeh;
– Great sharpness, even at larger apertures;
– 1.5x stretch which leads to an image close to the CinemaScope aspect ratio;
– Regular threads for diopters and filters.

CONS:
– VERY high prices;
– Minimum focus down to 2m (can be solved through diopters);
Multi-coated (Iscoramas 36, 42 and 54).

A brief note about the Iscorama 36: since the lens body is made of plastic, it’s quite common that as time goes by they are more prone to damage. Aiming at this valuable lenses market, british company Van Diemen developed a new housing for the Iscorama, fully metal made, with follow focus gears and a minimum focus modification that drops it to 1.2m instead of the original 2m.

The process costs £850 and has an estimated turnaround of 90 days to be completed plus mailing time. The conversion’s results are impressive but there are a lot of customers’ complaints about waiting a much longer time than advertised to get their lenses back.

There’s also a homemade modification to improve the lens’ minimum focus by unscrewing the front element and removing the original stopper. It’s risky if you’re not used to opening lenses, but works perfectly.

I’ve sent my Iscorama 36 for Van Diemen’s rehousing and wrote a full review of the process.

TO CHAPTER IIIC – DOUBLE FOCUS (2x) >>

Anamorphic

Anamorphic on a Budget – Chapter IIIA

December 16, 2014

< < BACK TO CHAPTER III - LENS RESEARCH

A – FOCUS THROUGH (1.33X)

The most subtle lenses, when it comes to stretch factor are also the newest ones. Between 1999 and 2004 the standard screen size switched from 4:3 to 16:9 and, the same way it happened in the movie industry, would be too expensive to replace all the camera equipment currently in use – specially for those who had just bought an expensive mini-DV camera.

The adapters’ manufacturers were scarce and their target market was composed by users of high-end cameras like Sony PD170, VX2000, Panasonic DVX-100 or Canon GL1 and GL2, that shot only at 4:3 aspect ratio. Panasonic made their own adapter, the AG-LA7200, one of the biggest 1.33x, expensive until this day. Sony and Canon were covered, mainly, by Century Optics (which ended up as part of Schneider Optics) and smaller brands (also less reliable when it comes to quality), as Optex and Soligor.


Optex 1.33x Adapter

These cameras had very different (and non-standard) mounts: some used bayonets, others had regular filter screws and different sizes. Each adapter had a specific back for the camera it should work with. Another important fact is that most of them were only partial-zooms, which means they only worked well within a specific focal range on the camera’s zoom range. From 50mm onward, the image would be completely blurry.

Focus was also fixed between 4m and infinity, so there would be some serious blurriness issues when the subject was closer than that. This design’s big advantage is that all focusing is done on the taking lens. It’s like focus went “through” the squeeze, easy to understand their name now, I think.

Both these negative qualities – partial zoom and fixed focus – reflect on their modern reuse, paired with DSLRs. Lenses over 50mm and subjects closer than 4m both require diopters to be in focus. Diopters are treated like filters but they’re actually auxiliary lenses and also go by the name of close-ups.

The biggest advantage of this type of adapter is that they allow the use of wide-angle lenses – between 28 and 35mm on a full frame sensor – without any vignetting from the internal walls of the adapter. Besides that, all the focusing is still done with the taking lenses, simplifying set workflow.

Their build is simple: just two cylindrical optical elements aligned with each other. All 1.33x adapters have a screw on the side that, when loosen, allows the user to rotate the glass and properly align the stretch direction.

Low quality on the edges and corners is a common issue with 1.33x adapters. It’s easy to notice strong chromatic aberration, loss of sharpness and barrel distortion when the taking lens is a wide-angle and you’re almost vignetting. Flares are also very strong, two thin lines easily recognizable by their strong blue tint.


Flare, lens distortion and chromatic aberrations on a single picture.

As many of these adapters have bayonet mounts, they require some modifications using step-up rings and pliers (still to be translated). Another challenge is attaching diopters in front of them in a safe way, since there are no threads for additional filters. There are clamps that work with the smaller models – Optex, Century Optics and Soligor – but the Panasonic AG-LA7200 is always a challenge due to its massive size.


Century Optics with clamp for 72mm threaded filters.

Panasonic’s greatest advantage, and the reason it’s still so valuable, is his optical quality that’s better than the smaller models and the fact that it allows much wider shots through 28mm lenses on a full frame sensor without any vignetting.

The downside is because of its size, it’s pretty hard to find properly sized diopters. With a great deal of help from a friend, Bruno Nicko, starting with a 3D model using the exact measurements taken from the front of the lens, we made a unique aluminum piece with 105mm threads.


Panasonic AG-LA7200 with custom 105mm thread clamp.

Without this piece, the only diopter choices for this lens would be from the rare russian LOMO Foton-A, or 4.5 inch filters. These diopters are big enough to cover the Panasonic AG-LA7200, but they still require some mods in order to attach safely to the front of the lens. There’s also a legend about a 105-86mm step down ring that no one ever found on ebay.


LOMO Foton-A +1 diopter.

Near the end of the DV fever, when many cameras were already capable of shooting 16:9 digitally through the pixel aspect ratio feature, Century Optics released the only full-zoom adapter for this dying market. It’s a big lens (almost the same size as the Panasonic) that, besides the alignment knob, also has a focus ring. This allows the user to have sharp images of subjects up to 0.5m (opposed to the original 4m for the partial zooms) and also use lenses longer than 50mm..

Its performance is much superior when compared to the other adapters – even considering its double focus aspect: it’s required to focus both taking lens and the adapter in kind of the same distance. Not nearly as precise as double focus needs to be (we’ll get to that in a couple chapters). It’s still possible to rack focus using only the taking lens, as long as you plan it well and set the adapter’s focus ring to cover the target range.


Century Optics WS-13-SB.

As you can see in the pictures of the adapters so far, the optical elements in these lenses aren’t circles, but more of a square shape, which means that the oval shaped highlights – anamorphic bokeh – won’t show up when this kind of adapter is used, first because the 1.33x stretch is too subtle to be noticed on the bokeh and second because the square aspect of the glass doesn’t affect the light shape. To achieve this effect it’s necessary to use a modified taking lens (see chapter IIIH – Faking the Look). On the bright side, when you have a 1.33x stretch applied to 16:9 footage – such as today’s standards – the resulting image follows a 2.36:1 proportion which means CinemaScope aspect ratio straight out of the camera.

A problem that didn’t exist when these adapters first came out is, due to DSLRs large sensors, getting a properly focused image using focus through adapters can be challenging. Mini-DVs have a 1/3″ sensors, which caused a larger depth of field. When you pick a sensor that’s almost thirty five times bigger than that, the best way to get a sharp image is to close down the iris on the taking lens. Apertures between f/4 and f/5.6 are usually enough to achieve good looking, good focus results. Diopters also help a lot when it comes to improve the quality of the images taken with focus through adapters.

A brief comparison between pros and cons for focus through adapters:

PROS:
– They’re focus through. All focusing is done on the taking lens;
– Relatively low prices;
– Allows using wide-angle lenses;
– Strong flares;
– Natural CinemaScope.

CONS:
– Strong lens distortion and chromatic aberration around the edges;
– Needs diopters when the taking lens is longer than 50mm;
– Needs diopters for subjects closer than 4m;
– Taking lens aperture should be between f/4 and f/5.6 for best performance;
– No oval bokeh.

TO CHAPTER IIIB – ISCORAMAS (1.5x) >>

Day-to-Day

Far Cry 4.

December 13, 2014

Um ano e meio atrás eu postei sobre a diversão que foi jogar Far Cry 3. Agora estou de volta, pra falar da edição seguinte. Lançado pouco menos de um mês atrás, Far Cry me manteve entretido por mais de quarenta horas. Jogar um shooter no PS4 é ridiculamente mais difícil que no PC, mas mesmo assim sobrevivi. Explorei todos os cantos, cavernas e montanhas de Kyrat. Em termos de gráficos, a diferença entre FC3 e FC4 não é lá grande coisa. A história tem similaridades também, e missões parecidas, mas há mais opções de escolhas e o jogo todo é muito consciente de si mesmo – o vilão constantemente questiona suas escolhas e ironiza o que acontece no mundo fictício.

De uma forma bem sutil, o jogo faz piada com seu próprio gênero, o que acho algo genial porque faz o jogador pensar, nem que seja um pouquinho, sobre o que ele tá fazendo ali.

Anyway, a destruição é fantástica e eles realmente acertaram no funcionamento dos explosivos dessa vez: carros e coisas voam primeiro, ao invés de entrarem em combustão espontânea com uma humilde granada, como era em FC3, o que faz a dinâmica de combate ficar muito mais caótica (por exemplo jogar um carro pra cima e passar por baixo a toda velocidade, enquanto dirigindo), dá pra criar barreiras e se esconder atrás, dá pra explodir TUDO (tem um lança granadas semi automático) – falando nisso, o arsenal do jogo é enorme. São 64 armas, sendo que a maioria delas tem customizações, lunetas, cartuchos maiores, silenciadores epor aí vai. O mapa é colossal – ao longo dos primeiros dias, achei que tinha andado pra caralho. Aí abri o mapa, e tava em menos de um décimo do espaço total!

Chega de rasgação de seda, isso não é um review, é só um comentário animado sobre ter terminado 100% hoje, e um print screen exagerado com TUDO que completei nas montanhas de Kyrat.

Day-to-Day

Lista de Chamada.

December 13, 2014

Entre todos os meus anos de escola, faculdade e afins, sempre tem uma coisa em comum que me desagradava: a ordem alfabética na chamada. Ok, se fosse só pra chamada era tranquilo, mas era também pra apresentações, entrega de prova, entrega de trabalho, então duas opções eram cenário comum e as duas envolviam expectativas baseadas em terceiros. Ou todo mundo ia bem, e eu ficava preocupado de ter ido mal, ou todo mundo ia mal e eu ficava preocupado de ter ido mal também, ou era absolutamente aleatório, e uns muito bem outros muito mal, e não tinha parâmetro do que esperar.

Acho que foi por isso que eu parei de ver trailers de filme: expectativas destruindo tudo. Eu adoro trailer, mas se o filme me interessa de verdade, eu não vou ver trailer de história, só teasers, que mostram planos legais, mas totalmente fora de contexto. Depois de ver trailers e filmes o suficiente, dá pra antever 95% da trama, inclusive com as revelações bombásticas, só assistindo o trailer. Se o filme é baseado num livro, ou qualquer coisa assim, menos mal, porque o fim já tá lá, e muita gente sabe, mas se é roteiro original, costumo evitar. Duas experiências recentes me provaram errado nessa teoria, porém. A primeira delas foi Edge of Tomorrow, que postei aqui uns meses atrás, que eu achei que ia ser só ação desenfreada e nada demais, mas o filme é absolutamente incrível, e depois Gone Girl, que vi com a May e o trailer te encaminha numa direção, mas o filme faz as coisas totalmente de outro jeito, e a sensação de surpresa, de não-esperado, é absolutamente maravilhosa.

Enfim, como e por que eu comecei a escrever sobre isso? Porque aqui na VFS a lista de chamada não segue ordem alfabética. Não sei qual é a ordem que eles seguem, talvez de matrícula, sei lá, mas sei que sou um dos primeiros, quase pelo meio, num lugar bem sossegado. Querem mais desvantagens de estar no fim da chamada? Enquanto seus coleguinhas Albertos, Alexandres, Andrés e similares são chamados primeiro, eles já começam a conversar, e você tem que ficar lá, prestando atenção na conversa e na chamada ao mesmo tempo, pra não tomar uma falta ou perder o nome na hora e mandar um grito depois de “ô professor! não ouvi meu nome! tô aqui!”, tipo aquele que a gente lança na hora que o ônibus tá lotado e você precisa descer, mas ainda tem seis infelizes entre você e a porta, e você corre se espremendo e se acotovelando enquanto o motorista começa a andar, aquele grito de “peraê motõ, que eu ainda vou descer!”.

Tá, falei mais um parágrafo inteiro e não expliquei como cheguei nesse assunto. Pelo menos falei da VFS, que era a origem do tema. Durante as apresentações de ontem, eu fui o penúltimo de todos. Ser penúltimo, previsto pra feedback às 2h30 é uma coisa, mas quando a história toda atrasa mais uma hora e meia, ficar esperando e pensando em tudo que você fez errado ou podia ter feito melhor começa a dar nos nervos. Nessas situações eu sempre acho que o resultado vai ser pior do que eu quero que seja. Não sei por que, talvez algo relacionado a “sempre se preparar para o pior”. Engraçado que essa sensação é pra quando as coisas estão terminando. Quando estão começando, eu sempre vou todo “ah, é tranquilo, vai ser moleza!”, e quebro a cara repetidas vezes – porque quase nunca é moleza mesmo.

Enfim, falei um monte de groselha que não é relevante pra ninguém. Vou pensar em um assunto ainda menos produtivo pra escrever.

Day-to-Day

Mudança de Formato.

December 13, 2014

Ontem tivemos o feedback e revisão dos nossos projetos de demo reel na VFS. Tá melhor explicado nesse post aqui, mas uma coisa é tão peculiar e relacionada com esse blog e minha evolução no caminho da fotografia que PRECISAVA ser postada aqui.

A GRANDE alteração no meu projeto é que o formato da tela agora vai ser QUADRADO. Proporção 1:1. Achei bastante curioso – e até engraçado – depois do grande surto e todas as experiências com anamórficas e tudo mais, meu primeiro projeto de verdade não é nem 4:3, é QUADRADO! Claro, o quadrado tá muito bem justificado na história e até na divulgação, mas ainda estou impressionado com essa série de acontecimentos.

Dezembro de 2013: “Nunca mais vou filmar em 16:9, widescreen normal é chato, vou vender todas as minhas lentes, agora é só Cinemascope, anamórfico, yeah yeah!”

Dezembro de 2014: “Foda-se o que eu disse, vou fazer um filme QUADRADO!”

A vida apronta cada coisa com a gente, né? Em termos muito positivos, agora vou aprender a força de composições quadradas, médio formato, visibilidade em celulares, redes sociais, e essas outras coisas loucas que a gente do cinema tende a achar que é muito previsível (eu pelo menos tendo a pensar assim), além de poder aproveitar as habilidades e conhecimentos de minha irmã recém-formada!