
Addressing one of the most common questions out there, here’s how to properly stretch your anamorphic shots using Adobe Premiere, After Effects, Photoshop and Final Cut Pro X.
USEFUL LINKS:
All the RED links on this post are part of eBay’s Partner Network, so if you purchase anything through them, you’re helping me to keep this project going.
You can support this project on Patreon. Make your contribution and help the Anamorphic Cookbook!
First, WHY do we need to stretch the footage? Well, the visual answer is pretty easy: “because things don’t look as they should”. Ok, and why is that? Because the anamorphic glass compresses the horizontal axis while keeping the vertical untouched. Good, so how much is that compression? The lens usually says and the most common values are 1.33x, 1.5x and 2x. There are a few odd 1.75x and other numbers out there, but once you get how to do it, the stretch doesn’t matter much. So now we know that the image is compressed by 1.33x, 1.5x or 2x in the horizontal axis.
Let’s trail off a bit. A pixel is the smallest area of an image, a tiny square with a unique color value. You noticed I used the word “square” just now, right? Nowadays most imaging resources (cameras and monitors) use a square ratio for resolution, which means that if you divide its height by width (or vice versa) you’ll get 1 as the result. Back in the DV era, cameras played with this ratio. 4:3 footage had a 0.9 pixel aspect ratio, while widescreen (16:9) had a 1.21 pixel aspect ratio. The sensor size never changed, neither did the recorded image, but the pixel aspect ratio told the editing program to stretch or compress the HORIZONTAL axis by that value. Hmm, this is becoming kind of useful, isn’t it?
Now we know that one can change a pixel’s aspect ratio, making all of them shorter or longer, according to a specific value, than the recorded image. Well, it seems this is what we need with all that stretch-factor thing.
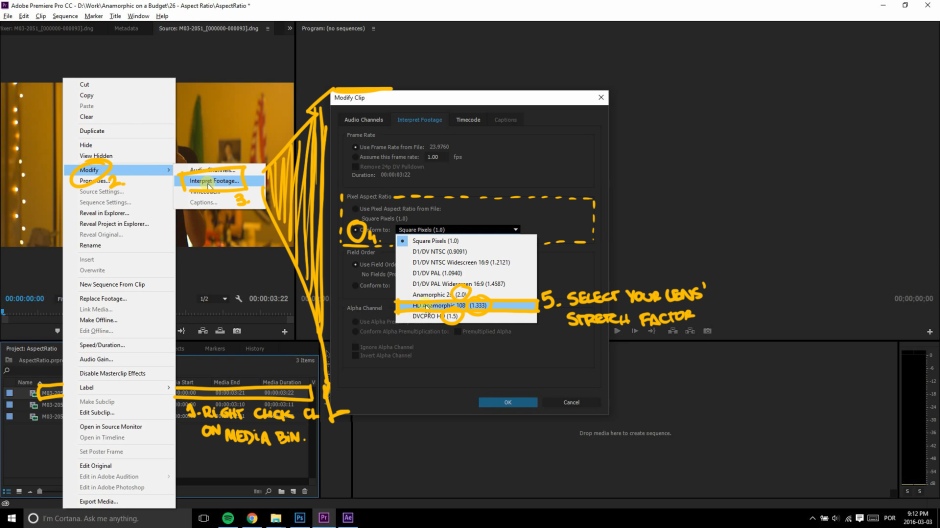
Starting with Premiere, import your footage and then right click on the file here in the Media Bin. From the menu, go to Modify, then Interpret Footage. A pop up will open and, look at that, there’s a “Pixel Aspect Ratio” menu! There you just need to pick your lens’ stretch and voilá, it’s done, looking just like it should.
After Effects has a few different options. First, you can import your footage and do the same thing as Premiere: right click, “Interpret Footage”, then “Main”, and in “Other Options”, change the “Pixel Aspect Ratio”. To preview this change, enable the Pixel Aspect Ratio correction on the viewer by clicking this icon.


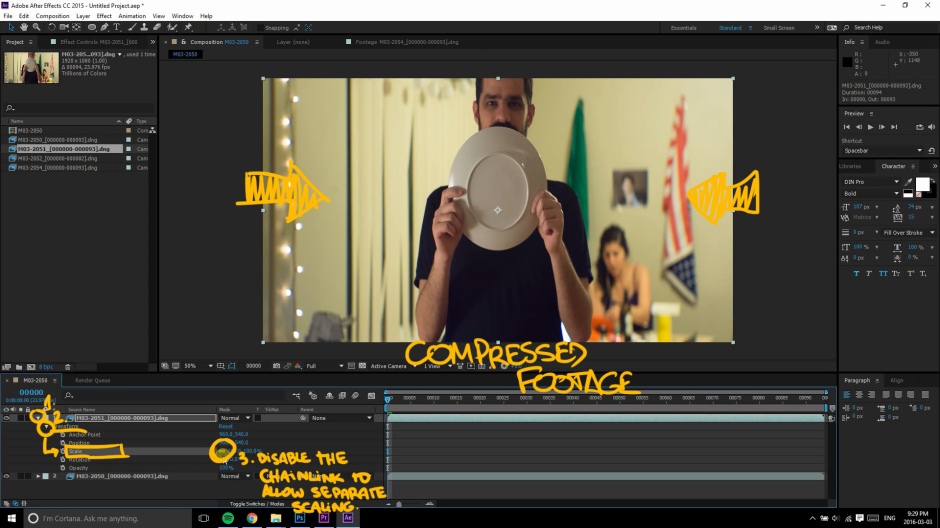
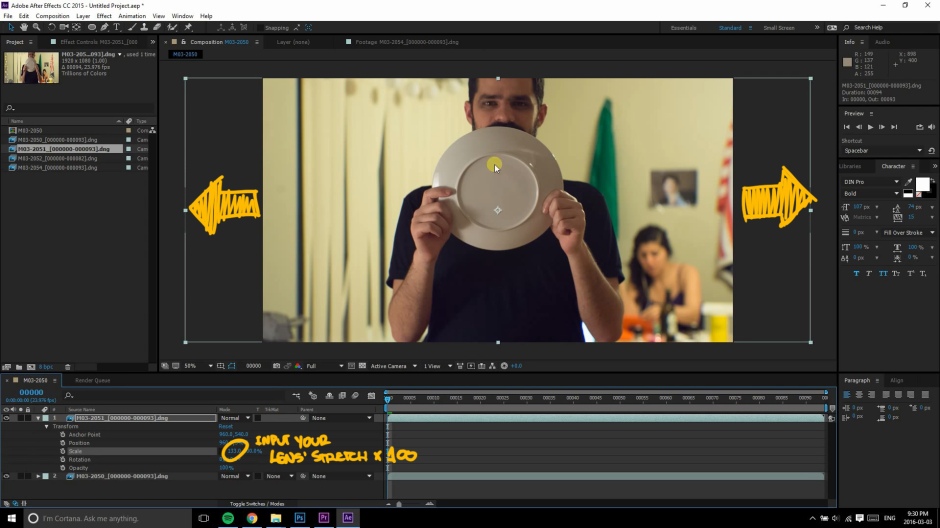
Another way is you just get your squeezed footage file, drop it into a new Composition, go into its Transform attributes, open up Scale and uncheck the chainlink here – this allows you to scale width and height separately. Once that’s done, just input stretch factor multiplied by 100 into the width field (it’s the first one). 133%, 150% or 200%.
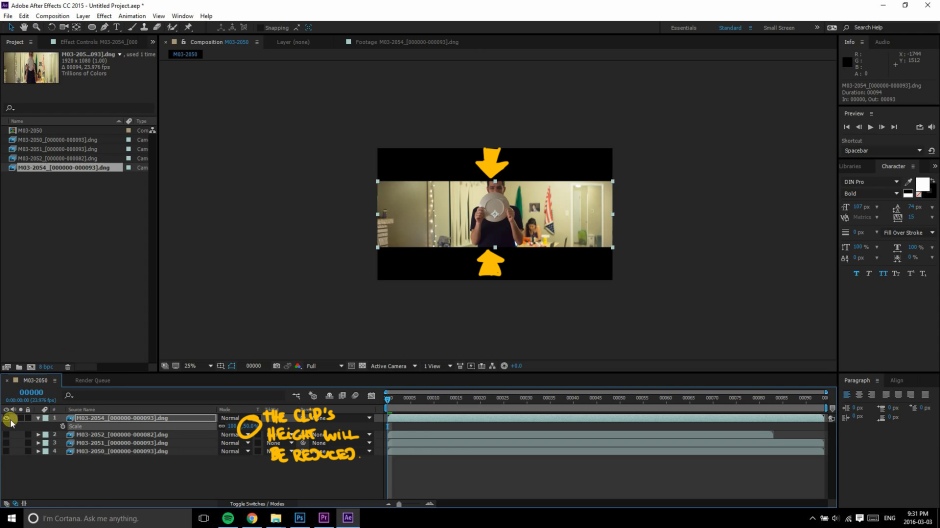
This part here is not exactly necessary, but it’s how I like to do it since I always output everything at 1080p: messing with the Scale attribute will give me an image that’s larger than my final resolution, so I do the step above as a start, then check the chainlink since this is the new ratio I want between height and width and bring the width back down to 100%. This will reduce the height of the clip and make it fit inside the composition. It also leads to a higher VERTICAL resolution, since the the vertical pixels have been downscaled. Like shooting at 4k to output at 1080p.

Photoshop is almost like After Effects. I’m gonna use a still picture here, since I still do a lot of anamorphic photographs. To open the Image Size panel go through Image > Image Size in the menus or press Ctrl+Alt+I . Here, select “Percent” as the measurement – it’s usually set to “Pixels”. You can see a chainlink here too, looks familiar? It’s ON by default, so turn it off and, again, input the stretch factor multiplied by 100. 133, 150 or 200, or any other value, if you have a different lens. Hit Ok and enjoy your right looking photo.


For Final Cut Pro X, import your footage, then create a “New Project” and in the pop-up window, select “Use Custom Settings”. Then, in the “Video Properties” section, instead of “Set based on first video clip”, set it to “Custom” and pick “Custom” from the dropdown menu. In the first field, regarding the width, input your shooting resolution multiplied by your lens’ stretch factor. For example, here I have 1920 multiplied by 1.33x equals 2553. Adjust any other fields that you might want to change, and press “OK”.


Now drag your clip to the timeline, click on it and go to the “Transform” menu. Click “Show” to expand the properties, then on the little arrow by “Scale” to show both horizontal and vertical scale. Finally, put your lens stretch times a hundred in the X scale, and the footage should be perfectly stretched to fit the project window. The process is exactly the same for other stretch values. For 1.5x, I’m gonna use 2880 by 1080, and then change the X Scale, and for 2x lenses, I’m going with 3840 by 1080, X Scale set to 200%. Then, edit, export, do whatever, with your now good looking footage!

Phew, that was a lot of different options, I hope I was able to help anyone out there having a hard time with the software or the concept of stretching the footage. If you liked this video, you should subscribe to the channel for the upcoming ones and then head on to the blog for a lot more anamorphic content such as the Anamorphic on a Budget guide, the Anamorphic Cookbook and a Calculator that helps you figuring out whether your lens will vignette or not. I also have an awesome t-shirt you can get to help me with this project! Now go out and shoot some pretty pictures for me since I’m stuck at home. Tito Ferradans out for a rainy Sunday.
[…] ‹ Anamorphic Chop Shop – Proper Aspect Ratio. […]