Yesterday we spent the whole day grouped together in room 105, reviewing and getting feedback from our mentors regarding our projects. It was pretty cool because we got to see everyone else’s projects, not just our own. Some very nice reels at work in 3D111, gotta tell you.
I was the second to last to present, so I ended up taking notes for a lot of people too. The review for Hovering Lights was quick and, fortunately, not about technical aspects, but regarding some story elements, which, I think, is a good thing because it shows the mentors care about the story.
Their comments were very focused on the garage sequence, suggesting some more complex actions involving aliens and car headlights, but still keeping all the events in silhouette shape. After the presentation, Fernão also pointed out a great alien reference for this particular scene, from the XCOM game series. The looks of the creature are close to what I had in mind, but they’re shorter, and move on all fours, but very quickly. He mimicked their movement around the student lounge and it matches with what should happen in the scene. This, of course, means we’ll have a new version for the script as well, coming out soon.
Another very important point of the discussion was about the aspect ratio for the whole reel. At first they thought the square aspect ratio of the first two shots was odd, and when I said “Instagram” they loved the idea and insisted that I had to do the whole thing Instagram-like, with duration-limit to every shot, as well as build up an instagram account to make the thing more believable.
This is an interesting turn in terms of the project development because it feels like a “back to its origins”. It started as a fake-video for youtube, to fool people into thinking it was a real event. Then I ended up bringing too much film into it, and with this, it’s going back to the believable illusion concept, which is also the heart and soul for Visual Effects: you can never be sure of what is real and what is not while watching a movie. I like the way this is going. If you wanna keep track of this and know when I start posting, just follow my brand new instagram (I never had an account and I actually dislike iPhones), the things we do for a project, right?
As extras, I’m posting here the one-frame slapcomps for the final shot, because they’re very close to what I hope to achieve. There will be much more detail in the ships, of course, but their menacing presence is well represented on these frames.
The following steps are reshooting the scenes using an iPhone to have a real reference of how it would look if shot on an phone, then when we’re ready to roll for real, shoot with a proper camera and wreck image quality as the last step of the process.
I still want to make a couple custom nodes for Nuke, for the camera overlays (that are being kicked off the project because they scream 1990’s) and some optical artifacts as well as the previously mentioned video glitches and corrupt frames. During the break I’ll talk to friends back in Brazil that can help me making the whole story and instagram account more believable.
I was feeling super lazy about working on slap comps. Fact.
In film production school all we do before the shooting is, SOMETIMES, a demo, which is a rough version of the whole movie in someone’s living room, with the director, producer and whatever crew members are available. It does help a little with figuring out the timing of things, but not too much. Almost all the ‘thinking’ is done during storyboarding and editing. We figure out how things should go together, we can see them playing in our heads, and foresee when the cut should happen. If it goes wrong, or isn’t fully achieved on set, it will be fixed during the editing process (which is quite long, even though most shorts are really short and don’t need all that time).
For our reels, we had a whole term (two months) of pre-production. Before the first class started I absolutely didn’t see the point in two classes a week to talk with mentors. I mean, it’s not like our projects are gonna be changing so much, so fast! Could’ve I been more wrong? Probably, because it can always get worse, but before breaktime of our very first class, I was already enjoying this much effort into pre-production.
Things escalated pretty fast until week four, when we met our mentors and had feedback from them. From their, I think I was too attached to my old ideas, and wasn’t so excited about changing them so much, to the point of reshooting a bunch of plates that seemed good enough for what they were supposed to do: kind of help people understanding my goals with the project. To me, everything was always clear as day, and when it wasn’t, I waited until ideas became less foggy.
Then last week happened and I noticed I had less than seven days to work out my final presentation for the term. I had a lot of changing in the script, reshoots, slap comps (which are quick and dirty versions of what you aim to achieve in each shot), new designs and a new premiere file to put together. CRAP!
Shot last Saturday (or was it Sunday?), just enough to make it work. I didn’t want to wrestle with Nuke and Maya for this, otherwise I was sure to miss the deadline, so I stitched the shots together in Premiere and from there I moved into After Effects – since it’s quick and dirty, nothing beats that definition from my experience with AE (eight years and counting).
I started doing the shots, as simple as I could, putting in as much of the final look as I could. Color correction? Check. Camera overlays? Check. Damaged footage? Check. Noise, practical effects faked in post, poor roto and garbage mattes, even a lot of audio work. After about six hours non-stop, new ideas started to pop up. Simple things that could make the shots better whithin themselves, an extra 2-second shot without any VFX that could really help blending between cuts, elaborate ways to fake camera movement and avoid nightmarish tracking, lighting setups, suddenly I was checking the ceiling for holes and gaps where I could attach a screw to hold a flashlight, or shooting reference of shadows through the curtains.
Most of this happened during Monday morning. By the time I left home to class I was so euphoric I couldn’t even take the bus and went walking so I could better process new thoughts. Wrote down a couple pages of notes, methods, plans and ideas that will be put to the test during winter break and term 4. Slap comping was also great to feel the timing of the effects. Imagining a person’s actions or dialogue is easy, but how can you measure a brief second of floating objects and your reaction to it? Where are they floating, exactly? What objects are floating? How long does it take? Everything we can’t see with our own eyes when shooting is greatly improved with a slap comp.
I feel the animatic itself is a little fast paced at this moment, and I will fix that when the final shooting comes. I’ll also need some extra hands to deal with practical tricks that will reinforce the digital effects. Last version coming up here on Friday, along with feedback from mentors and classmates.
After the first weeks of research, reading, watching tons of test videos and getting to the core of the anamorphic squeeze pros and cons, there were still plenty of questions unanswered. My curiosity got the best of me and so I decided it was time to invest in buying lenses. My starting point was Andrew’s Anamorphic Shooter’s Guide, from there I went on refining my decisions and ended up buying four lenses, all of them way different from each other and that will be better explained along the following chapters. They were Kowa for Bell & Howell, Panasonic AG-LA7200, Hypergonar Hi-Fi 2 and a 50mm LOMO Squarefront.
More experienced users reinforced the idea that I should use simpler taking lenses with less coatings to make flares pop. This meant no modern glass, no Canon L-Series, no zoom lenses. I ended up choosing vintage primes, from 1970-80, and was pretty happy with russian designed M42 mount all manual
(focus and aperture) lenses. The kit included a 37mm f/2.8 (Mir-1B), 58mm f/2 (Helios 44), 85mm f/2.8 (Jupiter 9) and 135mm f/2.8 (Tair 11). With these lenses I covered the standard focal lenghts in a prime basic kit and could figure out all my framing and composition using them and moving the camera slightly forward or back.
To flare out better those anamorphic features, it’s good to pair them with vintage, pre 1970’s taking lenses, years before the development of multi-coatings (MC), a physical high-vacuum process of metalization (I’m pretty sure this is mistranslated) that protects modern lenses from glass damage, lessen flaring effects and increase light transmission. This means that lenses made before this thing was invented are non-coated or single coated, which affects greatly anamorphic’s more proeminent quality: lens flares.
I’ve picked mine as M42 mount as a matter of personal taste, but there are plenty of other mounts that can be easily adapted to Canon EF. Even though adapters are quite common, before buying any lens, be sure to check if it works properly with the camera you’re using. A simple search is good enough to save you from a lot of headache involving flange distance and things being out of focus when they should be sharp. This also helps you to choose exactly which model you want and what features you want to accentuate on your work (I mean, there are countless types of 50mm around, which one suits you best?).
There was still an important unanswered question: how to connect properly both optical blocks, anamorphic in front and the taking lens behind it? LOMOs aside, all anamorphics can be considered adapters added to the taking lens, as a filter that you screw on top and gives you a very specific result.
In the very beginning of my searches I came across lots of posts stating that for working perfectly safe, you should use clamps to connect both lenses. Clamps are, in its essence, metal rings that attach to the back of the anamorphic adapter, mostly using screws, and end up on a regular filter thread that goes onto your taking lens. This allows the closest possible distance between the two optics, which saves us from the trouble of light loss when working with anamorphic lenses (usually the loss is so small it doesn’t even get to a third of a stop).
Redstan Clamp for Kowa Bell & Howell, 62mm thread
Many anamorphic adapters have threads on their backs already, but these aren’t standard sizes and we usually have things like 83mm or 73mm, that aren’t used nowadays. Clamps serve to fix this issue as well as to deal with stretch alignment. It’s possible to loosen the screws, without the adapter toppling over, and rotate the anamorphic block so the stretch is properly aligned with the horizontal axis. Screwing an anamorphic onto a taking and having it totally skewed in the camera is the first thing that happens when you switch lenses. It’s fundamental to align it properly or the final image will be irreversably skewed. Check the pictures below to see what this means, exactly.
The main advantage of purchasing a clamp that was made specifically for a lens model is that both fit perfectly – it never gets loose or puts any of your lenses in danger of falling -, feels perfectly safe and it’s super easy to align. There are very few real manufacturers and a LOT of improvised workarounds. Redstan, in the UK, is quite famous for his very specific clamps of the most common lenses, and Vid-Atlantic, an american company with cheaper options if you don’t want to spend too much money on a piece of metal. Redstan’s quality is unbeatable, but he’s quickly out of stock because they take a while to build and people are always buying.
As I said in the beginning of this chapter, each one of my lenses worked differently from the others, had different stretches, image quality and years of manufacture. I’ll split them according to stretch factor because it’s the easiest way to group them.
What are these so called “anamorphics”? The dictionary states “Optics. having or producing unequal magnifications along two axes perpendicular to each other”. In our case, a lens or adapter that distorts only the image’s horizontal axis. This is called “stretch factor”, which ranges between 1.33x, 1.5x and extreme 2x. That means that the resulting image will be horizontally squeezed and, in order to bring it back to normal proportion, you need to unsqueeze (or stretch) it following these ratios. A different name for stretch would be pixel aspect ratio: a virtual number that defines the width of each single pixel when displayed (instead of the standard 1×1 ratio).
And what’s the point of having something that looks totally weird in camera and then NEEDS to be post-processed so it looks right? Well, anamorphic lenses were “born” for the movies around 1950, when Twentieth Century Fox bought a patent for Henri Chrètien’s (a french scientist) system of bent lenses developed for astronomical research.
Years before, the movie industry had already got to the conclusion that wider images are more appealing to human eyes. There was already a process to achieve such results, called Cinerama, in which movies were shot with three simultaneous cameras and showed in a similar setup with projectors using a curved screen that was way bigger than the current standards. The downside was triplicating the use of celuloid for each single movie during production, and even larger amounts during distribution, which wasn’t being so profitable.
Around the same decade, three different methods of anamorphosis competed in the industry. The first one was based off prisms, developed and used by Panavision, the second was achieved through the use of bent mirrors, Technirama and the third one is our all-time favorite, the subject of this work, bent lenses that compress the captured image, originating the famous – and desired – CinemaScope, 2.4:1 aspect ratio, meaning that for each height measurement, there’s a 2.4x measurement in width.
Celuloid frame and different methods for a widescreen image. Letterbox on top and anamorphic on the bottom.
In Chrètien’s design, the image compression would be directly related to the glass’ curvature. His anamorphic lenses were made up, roughly by two optical blocks. The front block was responsible for the anamorphosis and the rear block was a regular spherical lens, both put together inside a single lens body. Simpler setups work the same way until today (we’ll get to that) and you have to focus both spherical and anamorphic separately.
From here on, the spherical block will be referred as “taking lens”. It’s an important concept that will be used over and over. Don’t get confused.
Once the image is shot and squeezed onto the film roll – there was no digital intermediate back then! – another anamorphic lens was required when projecting the final motion picture in order to de-stretch the image. These projection lenses are still out there, flooding ebay and every other online market. They’re bulky, colorful and heavy. Another downside is their really far minimum focus distance since the screen and the projection booth is usually somewhere between 9 to 15m apart.
Meanwhile, across the world – the Cold War was going on and the USSR was also a major technological center – LOMO anamorphics were coming out, russian lenses made by their main optical developer, responsible for all camera and movie gear in the country conglomerate. These lenses were made solely for motion pictures and, differently from the american/french design, anamorphic and spherical blocks were split by default, but could be connected through a simple bolt, which made sure focusing on both blocks was identical and solving the issue of having to focus each lens individually. These were pretty strong builds and spread mainly across Asia. As the american standard, LOMOs had a 2x stretch.
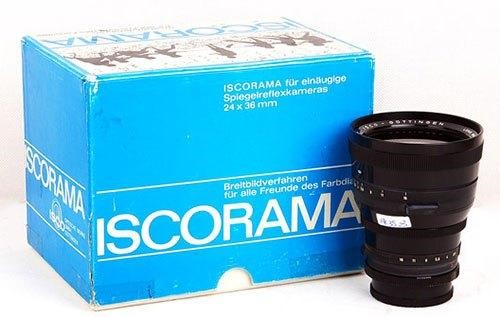
At the beginning of the 1960’s, ISCO Optics of Göttingen, german manufacturer hires the man behind LOMO’s designs, deliberately replicating his previous work with LOMO, ISCO releases a series of anamorphic lenses – the Iscoramas, with a stretch of 1.5x – aimed at the “rich amateur photographers” niche. The series consisted of a front anamorphic block attached to a 50mm f/2.8 cheaper taking lens (with Exakta, Minolta, Nikon F or Praktica M42 mounts). Image quality matched the market: sharp from edge to corner.
The Original Iscorama – 1.5x stretch
Almost twenty years later, in the 1980’s, Iscorama’s users found out it was possible to split both parts of the lens and use the anamorphic block paired to other taking lenses. ISCO takes advantage of this practice to release updated versions of their products, getting rid of third-party manufacturers by discarding the 50mm taking lens and selling just the anamorphics. Those were the incredibly famous Iscoramas 36, 42 and 54.
The optical engineer behind these lenses used a design based on variable diopters, in which the taking lens is focused to infinity and all the focusing is done on the Iscorama. By registering this patent, ISCO Optics of Göttingen killed any other manufacturer’s dream of replicating its solution. This caused a drastic loss in terms of similar workarounds until this day, making Iscoramas a unique species.
What we’ve seen so far: based on the need of creating wider-looking images and avoiding redesigning and making every single motion picture camera currently in use, scientists develop anamorphic lenses that attach on top of regular spherical lenses and compress their images. Russians aren’t far behind and develop their own kind of lenses. Germans steal the russians’ formula and improve it, releasing the Iscoramas, which hold single focus patent.
Following these events, japanese companies start making their own anamorphic elements (Kowa and Sankor), with a 2x stretch, and even Henri Chrètien through Societe Technique Optique de Precision puts out some lenses for cameras and projectors, the Hypergonars S.T.O.P.
Market keeps evolving and, while some of these lenses were pretty good with 8mm and 16mm film, with the change from film to video, and later, to all-digital formats, amateur anamorphics are less and less useful and end up forgotten at the bottom of “used gear” boxes. Videocamera’s lenses aren’t interchangeable and still photographers were never too fond of the squeezed images. Around 2008 almost all these anamorphic gems could be grabbed off eBay for less than US$200.
The last additions to the anamorphics list came out after mini-DV cameras became popular. These are focus-through adapters and their name comes from the fact that they don’t have a focus ring, just a simple screw for proper alignment – so the stretch is applied on the correct axis. Focusing is done on the taking lens, attached to the camera.
At the top of its game, Panasonic’s DVX100 – the camera that brought the power back to the indie moviemaker – got its own anamorphic adapter, the Panasonic AG-LA7200, with much greater size and quality than this generic-branded competitors.
These adapters goal, however, isn’t to achieve CinemaScope aspect ratio. Most mini-DV cameras, and even the DVX100, shot with 4:3 aspect ratio, as any default TV at the time. These adapters came out to allow older cameras to shoot in the new and widescreen 16:9 “modern” proportion, much like what happened in the the movie industry: it’s cheaper to buy an adapter than a new camera. Unfortunately these weren’t a big hit because they were already pretty expensive and not many people were willing to pay extra for them. Were also forgotten and discontinued.
We’re finally at 2009 and all these lenses can be found on eBay for laughably low prices. Canon 5D Mk II came out the previous year and it was revolutionizing digital video’s world. Then, a curious dude (or gal) like you and I decided to check if these old, weird and (at the moment) pretty cheap lenses could work with DSLR’s video capabilities.
I can only imagine his/hers surprise when the thing worked and, not only that, the resulting image was amazingly wide and unique. Results were posted online and some more people got curious. Among these it’s easy to name Andrew Reid – responsible for EOSHD and author of some of the books used during my research -, Edwin Lee – famous for being a pioneer in anamorphics and DSLRs – and Alan Doyle, also known as Redstan – a great source of knowledge about motion picture anamorphic lenses.
Shortly after processing the boost in width, the new anamorphic users realized a couple other features inherent to those lenses and adapters that were pretty hard to achieve if not using them, which had a lot to do with the images’ cinematic feel. The first of these features was the different bokeh, out of focus highlights, which remained oval even after proper unsqueezing. With regular spherical lenses, bokeh has always more of a circle shape.
Another unique feature that quickly drove anamorphics up in popularity not only among the indie productions but also on big budget feature films was the anamorphic lens flare. Lens flares aren’t always bad, specially if used while developing a unique look. Anamorphic flares are long, streaked and (usually) blue. They’re totally different from spherical flares and have a lot of personality. Using J.J. Abrams as a reference (easy one, I know), anamorphic flares are a constant through his work and we can easily spot his signature over a couple brief seconds.
From these various tests, reviews and experiments published over YouTube, Vimeo, EOSHD and other online forums, many others got interested in the game and so began the rush for anamorphic glass worldwide. In less then a year, Iscoramas that went for US$200 now reached US$4000 on eBay auctions. Many other lenses were also sold for crazy-high prices.
Following this raise in value, many anamorphic owners decided to sell their beat up old lenses, increasing the availability and lowering overall sales prices. Now, a couple years after the initial outbreak, an Iscorama goes for about US$2500 on auctions and a little more in direct sales.
LOMOs’ prices are widely apart since many of the already have cinema mounts and quality standards, so can easily go over US$4000, but it’s important to keep in mind that these were never cheap in the first place and we’re brought into the DSLR world through the use of adapters. I won’t risk writing about focus-through adapters and projection lenses because their prices don’t seem to follow such strict rules.
Over the last months the anamorphic community and enthusiasts rejoiced with announcements of brand new lens designs and releases to come soon. Among them we have SLR Magic – Hong Kong based – and Letus35 – in the US. Both promise a 1.33x stretch and focus-through adapters with custom controls for situations such as close up shots. Price ranges between US$800 and US$1300.
One of the main things for me in photography is the strong connection between technique and creativity one has to make to achieve good looking results. Knowing how the camera works isn’t enough. We need to understand human vision, composition, colors, light, and find/develop our own style.
When I started to attend to Film Production (Curso Superior do Audiovisual, at USP), in 2010, I was already taking pictures for and studying photography for a year and a half. It was my main hobby and entertainment while not studying the subjects that would get me into the university.
Coming from a very math-based background (Computer Science at Federal University of Bahia, UFBA), numbers were already pretty exciting to me. Through my four years at Film Production I started to develop and emphasize the creative part of the photographic process as well. Be it a single frame, be it moving pictures at 24 frames per second.
During summer break (winter break, for the north hemisphere), mid 2012 I was feeling bored and needed to learn something entirely new to me. I decided it would be a testing and experimenting year, very different from my standard, production-like work of the previous three years. Randomly roaming the web, came across a subject that had already caught my eye before: anamorphic lenses. That summer felt like the perfect time to go deeper into them. It was time to move from 16:9 TV standards to something more movie like as the 2.4:1 CinemaScope aspect ratio.
When I say I had already come across the subject before, it was around 2010 and, again randomly, read some articles about such lenses, that would allow shooting CinemaScope straight from camera instead of cropping the top and bottom of the frame. It was interesting at the time, but I lacked the technical knowledge to fully understand what was being said on those articles. Time went by and I ended up forgetting all about until 2012’s summer.
In the meantime whenever I considered shooting CinemaScope pictures, I always felt bad for discarding almost half the image through cropping. Such a waste of money and production value, right? Using the crop method for CinemaScope you either go ultra wide angle so you can frame your characters properly and end up with a ton of depth of field, or go with regular lenses and hope nothing too important ends up cropped off in post-production.
Without and with anamorphics aspect ratio comparison
After my initial readings I found out that with anamorphic lenses the image is squeezed before it reaches the sensor/film. Its horizontal correct measurement is determined by the image’s default width multiplied by a stretch factor (which may vary from lens to lens). You don’t discard parts of your frame, quite the opposite, you add more into it, you add stuff that would fall outside of a regular spherical lens angle of view.
From 2012 until now I’ve read countless articles, threads, forums, posts, ebay auctions and even a book entirely on the subject in order to better understand these lenses inner workings. It’s not all pretty and wonderful as it seems in the beginning, but they achieve a great deal of what I expected. There are various complications and quirks, but nothing that’s absolutely impossible to merge onto set work procedures.
I reached out for other anamorphic users in Brazil, lenses for sale, trade or testing, any kind of answer for my questions in my own language. Didn’t find anything at all, just a bunch of curious people like me. With the internet’s connecting power I went virtually abroad and started researching and experimenting. During this process, way over twenty different anamorphic lenses went through my own inspection and analysis.
This series of experiments were followed by ongoing posts on my personal blog (this one right here), aiming at introducing the subject in portuguese. I was pretty much obsessed with these lenses already and had to share my knowledge with whoever was interested, specially because I had a ton of questions at the beginning and couldn’t find any answers until I had the lenses in my hands and looking through the camera.
Research has been an amazing experience. During the process I ended up selling ALL my spherical and modern glass, keeping only vintage russian lenses and anamorphics. I don’t intend to leave them, it was a point of no return.
My main goal with this project is to share as much as I can of all I discovered and tested with these exotic and rare lenses, be it in terms of origins and history, as well as practical use in real shots.
I mean, amazing CinemaScope pictures in a camera that costs less than US$4k, when could I dream of this?
Ok, tem seis meses e umas duas semanas, mas ainda tá valendo, tá perto o suficiente. Esse post é uma montanha russa, então, nem se empolguem muito nas partes eufóricas ou se preocupem nas depressivas!
O que me motivou a começar esse post foi a arrumação de arquivos de ontem, quando comparei o tanto de material produzido ao longo desses três terms de VFS.
Term 1 – 06gb
Term 2 – 25gb
Term 3 – 60gb
Achei a gradação curiosa, e resolvi escrever um apanhado muito doido, como verão.
Quando me mudei pra Vancouver, em Maio, vim mentalmente preparado pra um curso puxado, pra ter aulas infinitas todos os dias da semana e várias tarefas para fazer no tempo livre. Vim pensando em comprar uma bike e não andar de ônibus, vim pensando que aqui não neva e que ia ser tranquilo aguentar o frio. Carreguei comigo duas malas tão pequenas que todo mundo que viu achou surreal. Trouxe o mínimo possível. Só roupas práticas, finas e quentinhas, roupas o suficiente pra durar uma semana e meia se não desse tempo de lavar num fim de semana. Trouxe UM livro, muito relacionado com o assunto a ser estudado. Até minha toalha era daquelas de camping, que seca guardada e é menor que uma camiseta. Planejei meticulosamente todos os meus passos pra, se tudo desse errado, e eu ficasse preso num aeroporto por dez dias, minha malinha tinha tudo que eu precisava. Se eu não achasse onde ficar definitivamente nesse tempo, também dava pra sobreviver na cidade.
Trouxe dinheiro em dinheiro, porque nunca se pode confiar totalmente num cartão de crédito, trouxe meu único casaco de frio de verdade e dois pares de luvas que esquentam e ao mesmo tempo não me impedem de trabalhar. Pensando agora, acho que eu devia ter trazido mais tralha.
Além de todas as minhas coisas, ainda trouxe na malinha quatro caixas de café para o Wyll, que me recebeu por aqui.
Computador, comprei aqui, porque não dá pra viver sem. Acho que a ÚNICA coisa da minha bagagem que realmente me representava era a câmera, e mesmo assim, em sua configuração mínima. Me empenhei em vender TODO o equipamento fotográfico exceto peças chaves e lentes com extremo valor sentimental (e financeiro! hahaha). Mesmo no que eu sou sangue quente, eu fui sangue frio.
Cheguei por aqui e a vida foi bem fácil nos três primeiros meses. O term 1 era puxadinho, muita coisa nova, mas rolou numa boa. Muita gente nova, gente de toda parte do mundo, com pensamentos e culturas totalmente diferentes, falando uma língua diferente, que também é diferente de sua língua nativa, inclusive eu. O rush de “tudo novo” era incrível e dava gás pra fazer as coisas com muito ânimo. O verão ajudou um bocado também, com dias que começavam às 4 da manhã e que o Sol só descia às 10 da noite, calor de sobra, nada de chuva, uma brisa boa de praia, tudo perto de tudo, pessoas bem humoradas e dispostas a ajudar em qualquer situação (a gentileza canadense é real, mas tem suas exceções), a vida era só beleza.
Logo antes de começar o term 2 a May chegou por aqui também. Fiquei ansioso, passei uma semana comendo quase nada, só esperando ela chegar. Saudade da porra, dois meses longe é foda. Decidimos até casar, o que também foi (e ainda é) grande motivo de alegria. Acabou o break e as aulas da May começaram. As minhas recomeçaram.
Puta que pariu, o term 2 foi pesado. Tão pesado que quando a gente conversa na sala, e lembra dos idos do term 1, a sensação é que tem mais de um ano. O verão tava acabando e começava a chover mais. As árvores iam ficando amarelinhas. Deixei de fazer muita coisa porque tava correndo contra os assignments e apanhando de algumas aulas que eram difíceis de acompanhar. Quando o term 2 acabou, e tivemos um break de 4 dias, as coisas ficaram meio confusas. Era estranho num dia ter um bilhão de tarefas altamente complicadas e elaboradas pra entregar e no dia seguinte não ter nada. NADA. Bateu um puta vazio. Sabe, qual o sentido disso aqui? A gente quer ficar aqui pra sempre? Qual o objetivo? E aí eu fiquei mal. Fiquei bem mal.
No último dia do break, um domingo particularmente dramático, deprê, de chuva e frio, chorando e conversando com a May, achei um fiapinho de luz pra me agarrar e seguir. O term 3 foi meio descompassado. Em termos de aulas e assignments, foi bem mais tranquilo. Fiquei amigo de muita gente na sala também – até então era só colega, foi aqui que começou a mudar. O que ia bem em termos de trabalho e estudos ia caindo e quebrando em termos da vida. Fui parando de comer, não tinha fome ou não tinha vontade de colocar nada na boca. Ficava enjoado de comer meia fatia de pão, ficava enjoado de ansiedade pra qualquer coisa, tinha dias terríveis de fim de semana, onde o único objetivo do dia era esperar o dia acabar.
Logo no começo do term, comecei a fazer terapia via skype. Até começar a primeira sessão, não tinha botado muita fé na experiência. Ao fim da primeira sessão, fiquei me perguntando porque não tinha começado antes. O processo ainda tá avançando, mas já descobrimos coisas bem relevantes. O que eu tinha feito com minha malinha, seis meses atrás, eu tava fazendo comigo mesmo agora. Se tem chance de ser desnecessário, é descartável. Tava ficando vazio de mim mesmo, corpo sem recheio (física e espiritualmente) enquanto a cabeça lógica e calculista mantinha tudo funcionando no limite. “Você precisa voltar a investir nos seus desejos, Tito”, Paulo, o analista, me falou. “Como é isso, Paulo? Eu não tenho vontade de nada!”, “Tem sim, só tá bem fraquinha. Você vai perceber, nos próximos dias, que algumas coisas te chamam. Não ignore, siga. Aos poucos, vai voltando ao normal”. Putamerda, que parada abstrata. Na lata, a única vontade nessa hora era de chorar, e então foi isso que fiz, e foda-se.
Essa conversa foi terça feira dessa semana. De lá pra cá, de fato, achei coisas que me chamavam. Andei pela cidade como não fazia há meses, sem a pressa e preocupação de ter que prender a bike em nada, assistindo o mundo enquanto o ônibus vai de um lado pro outro, gastando tempo em coisas que não tem NADA a ver com meus assignments (passei uns quarenta minutos numa loja de quadrinhos, só olhando as capas), providenciei um adaptador para uma lente que tava na mochila há seis meses, COMPREI uma lente (e viajei uma hora e meia de trem pra buscá-la…), coisas que não eram parte dos meus deveres, só desejos.
Na semana passada eu comecei uma viagem de que como eu tô sempre enjoado e nada quer entrar é porque algo tem ou quer sair, então comecei a falar e agir de acordo com minha vontade e sem me preocupar muito em agradar os outros. Tive uma mega conversa com meus pais, falei que tava morrendo de saudade, chorei daqui, eles choraram de lá, falei que tava magro, que não tava comendo direito, que o frio desgraçado fazia tudo parecer pior. Eles foram as pessoas mais incríveis do mundo, ficamos horas conversando sobre providências possíveis e o que eu mais gostei disso tudo é que eles nem tentaram me obrigar a nada. Sei lá porque a gente tem essa impressão de que os pais querem obrigar a gente a fazer as coisas… Depois de alguns muitos minutos já estavam eles de lá, falando que era muito bom comer chocolate, mas chocolate do bom, porque é bom pro raciocínio, tem gordura, tem leite, e por aí vai. Nos dois dias seguintes, meu pai ligou pra cá de manhã cedinho – que pra ele é perto de meio dia – pra conversar sobre nada. Nos outros dois dias, conversei longamente com minha mãe, também sobre nada específico. Conversar em português faz falta, conversar com gente conhecida faz mais falta ainda. Percebi que só escrevo em português aqui nesse blog. Em quase quatro meses de aula, fiz UMA anotação em português no caderno.
Voltando aos desejos e à terapia, hoje eu reparei uma coisa em comum com tudo que me animou nesses dias: foto. Caralho, hein? Eu digo pra mim mesmo que vou deixar essa vida pra trás e ela me persegue! Acho que não é saudável tentar dosar o que fala com nosso eu-de-dentro e vou passar a apostar nisso. Eu achei que meu conhecimento de foto ia ser uma grande ajuda pra entender coisas de 3D e compositing, mas não é bem assim. Pessoas de 3D e compositing tendem a ser um tanto simplistas quando a conversa se chega perto de uma câmera. É um “mínimo para fazer funcionar”, e só em termos práticos. A maioria das coisas não tem interpretação nem justificativa.
Aquelas aulas de história e baboseiras teóricas da USP que eu tanto desci a porrada, lembra? Pras várias pessoas que eu falei que “audiovisual só vale a pena pelos contatos”? Eu retiro essa opinião. Não é um curso perfeito, nem de longe, mas o que a gente aprende com as aulas de história, e nas discussões, e conversas de corredor, e desenvolvendo projetos e tentando justificar nossas idéias, amarrando a técnica na teoria (“aqui a gente usa bem pouca profundidade de campo porque é mais ou menos assim que o personagem tá nessa cena”, e por aí vai), isso tudo é de um valor imensurável.
A técnica se aprende na marra, penando e se esforçando. A teoria é mais refinada. Decidi andar na corda bamba entre as duas coisas e ver pra onde isso vai me levar.
Voltando pro mundo da foto, depois de seis meses, finalmente fui testar o diabo da lente (comprei o adaptador errado ontem, e fui hoje trocar, depois tenho que escrever sobre andar de ônibus em Vancouver). É tipo um Iscorama 54, só que com stretch de 1.33x ao invés de 1.5x. Eu só queria tirar uma foto pra checar se o foco tava funcionando direito, se a lente tinha algum defeito, essas coisas. É uma anamórfica bem incomum e tem pouca informação sobre ela na net. Liguei a câmera, apontei pra quina do quarto e gostei da composição. Meu objetivo inicial: apertar o botão e pronto. Quinze minutos depois eu tava ligando abajur, fechando cortina pro quadro ficar mais bonito, escolhendo os objetos em cima da bancada e elaborando o workflow depois que a foto estivesse no computador. Foto é demais pra mim. Eu não CONSIGO só apertar o botão, e eu não acho que isso seja ruim.
Enfim, o resultado do teste, a UMA foto, foi essa aqui:
Que além de representar uma pá de testes técnicos que eu não vou descrever aqui (não nesse post, pelo menos), tem vida, mesmo não tendo nada vivo em quadro. Essa foto sou eu e a May, juntos. Ela é o vermelho, é o violão, é o toca discos, é o calorzinho. Eu sou a lentezinha, o azul da janela, o abajur achado no portão da garagem, o formato anamórfico.
Acho que falei isso nos post anteriores, mas a May é genial. Ela tá praticamente morando na VFS pra dar conta do term 2 (que também é super pesado pro Sound Design), eu geralmente tô em casa trabalhando ou na VFS também (campus separados), mas mesmo assim, nunca me senti tão em sintonia com alguém na vida. É uma coisa tão louca que não dá nem pra botar em palavras (clichêêêê), é um porto seguro, é onde eu sei que posso ser absolutamente eu mesmo, e ela pode ser ela mesma, é jogar donkey kong antes de dormir e xingar as porras das fases de carrinhos e foguete, é arrumar o café da manhã no piloto automático e gostar de acordar 7 da manhã, é ter as conversas mais loucas e honestas do mundo no meio da madrugada, é aquela vozinha que diz que vai ficar tudo bem, quando o mundo é uma tempestade de desgraça, e que você acredita, porque vai ficar mesmo.
Antes que eu comece a viajar, pra fechar o post, esses somos nós, sem nós, com a lente que eu fui em Surrey buscar.
Não sei se ficou tudo amarradinho como eu queria, mas definitivamente é um dos posts mais pessoais desses seis anos de blog, então foda-se.
We heard, numerous times, this assignment would be hell, that nothing works and people go crazy over it. I think no one is going crazy in our class. Tracking was hard, that’s for sure, but after that, it was all fun and this is what I’m writing about in this post. Seriously, this has been the coolest assignment so far for a couple reasons, specially a great deal of freedom to play, instead of following specific in-class steps.
Here’s my final version, and below it I’ll break down my tree and go over some tricks I tried and worked well for this (and Sean got them all, I think!). Since the video is quite small, be sure to check the 480p youtube option.
Now, Nuke.
I started with my plate, shot right outside my building’s garage. From day one I wanted to have a trashbin there for the spider to interact with, so I started modeling weeks ago, so it would be finished on time to be a part of this. More on the trash bin here. My first shots were bad and too shaky, so I ended up reshooting, with the glidecam and higher shutter speeds instead of my default “handheld 1/48th of second shutter”.
Reformat, to bring it down from 1080p to our standard VFS size and Lens Distortion so it matches the spider renders coming out of Maya. I’ll ignore this Color Correct “Darken Plate” for now and come back to it a couple lines ahead.
I had two color passes grading branches because the spider and the trashbin are both in the same image, but I wanted different values for each pass for each separate elements. Grading went as it should, and in the end the matte pass defines what is going to be merged onto the main pipe (spider first, then trash bin).
As most of the lighting was coming off the IBL, I just added a small volume light inside the bin so I could bring back some of the inside texture and avoid having pitch black interior, specially because the spider is in there at the beginning, and the robot casts some light! (Thanks, Cameron, for the hint of animating these grade nodes)
The indirect pass has most of the light information. The IBL was created from a chromeball, shot along with the plate. It was weirdly blue and I had to go and fix it in photoshop before the final renders. Not sure if it’s always like this (other classmates told me they had the same issue with a strong blue cast).
The spider has an almost fully reflective material, so it’s still mainly black so far.
For the reflections, even though I had the IBL and the results were ok, I was pretty sad because the ground was so close to her and the reflection didn’t match so well. What I did to fix this issue was, since my tracking matched the footage from start to finish, I camera projected the plate onto the proxy geometry of the environment and disabled its primary visibility for this pass. This got me perfect reflections from the ground as the spider moves anywhere. The top reflections from the IBL were already good enough.
The refraction just added the spider’s eye, that has some glass in front of it. Nothing too fancy. If I had a close up, you could notice the nice bump it has. No need for it here.
Since the IBL doesn’t cast spec highlights, I added a strong directional light where the sun is positioned and this gave me good highlights on the spider and very subtle details for the trash bin.
Now the main elements are already comped together and we just have to go through integrating them better.
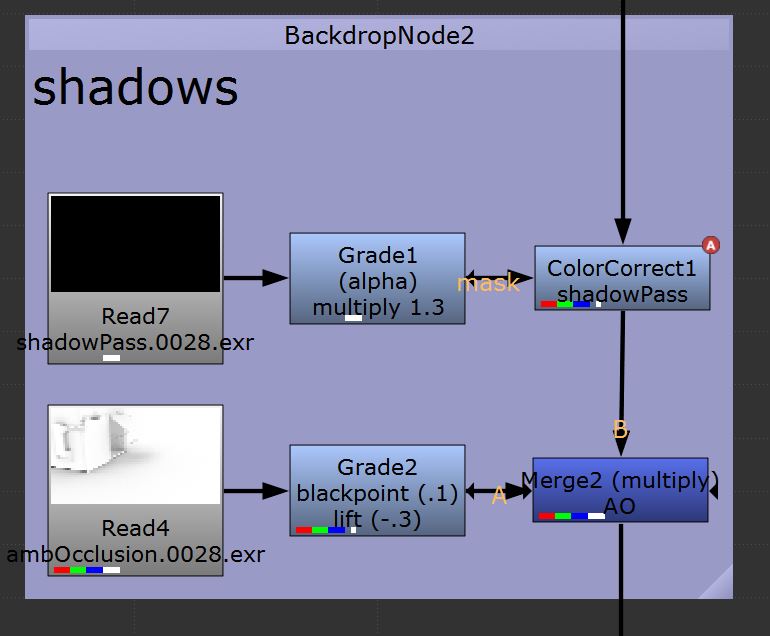
Bringing in the shadows! Here I had to do some tweaking because if I had my shadowcasting light where the sun was, on the IBL, the image looked WAY TOO FLAT and fake. As the sun isn’t directly visible on the chromeball, I just moved it on an angle and softened it a lot, so it would feel like it’s light bouncing off a wall and with an “indirect” feel to it.
I’m still not happy with this shadow result, so I’ll play some more with it ahead, on the RGB light pass, for now, let’s just keep moving onto the ambient occlusion pass. For this I talked a bit with Petar because the proxy environment is required in the pass, otherwise we wouldn’t have the spider and trash bin’s contact points with the ground plane/wall, but if the proxy environment is part of the pass, it occludes itself and doubles the shadows that already occur in the real world. In order to solve this issue, Petar contacted Craig, who provided us with a nice custom attribute for polygons and the mib_amb_occlusion node in Maya, the inclexcl and nonself attributes. They allow you to define which piece of geo occludes itself or just others. As I’m sure Craig doesn’t like his class materials going online for free, here’s an alternate explanation for this method.
Here’s the AO pass without the proxy environment occluding itself.
And that multiplied into the main data pipe. This really brings the image together and sticks the spider and the bin to the ground. It also kills a lot of that strong and weird inside of the bin, as expected.
This concludes my shadow renders and moves us forward to the RGB passes which are amazing for great changes very quickly.
I won’t go over the rim pass because it’s just a material assigned to the spider and, on this specific frame, it makes almost no difference. Over the course of the animation, it reinforces the shape and reflectivity of the robot in a very (VERY) subtle way. I like it and I think it works pretty well (and it’s a quick render, so I didn’t die to have it here).
I forgot to add the bin to this pass, so the RGB matte was also useful in cutting off the claws that are under the metal lid. They were shining through it almost until my last render, when I was putting the breakdowns together and noticed the error.
There were a couple things I wanted to achieve right off the bat with my RGB lighting pass. Three things, actually, which is quite convenient, since I had three colors for it.
The first thing was to create the spider’s light, coming out of its eye. This is a particularly bad frame to show this, since most of it is hitting the inside of the lid and bouncing back to the ground, but over the animation is pretty easy to see the result. I used a red spotlight, constrained to the main body control, with quadratic falloff so I could make it stronger or softer using the gamma slider in Nuke.
The second thing was a better control of the specular highlights. Blue channel for this, also very subtle but effective.
Third objective, that shadow improvement I mentioned earlier. I used the inverse of my green channel. The green is a directional light casting soft shadows on the ground from both trash bin and spider. The bad side of it, as you may notice, is it casts shadows on the back wall as well, not just on the floor. For this one to work, I used the green from my matte pass merged with a poorly animated roto (10 keyframes total) that covers only the ground plane.
Each of these separate channels go as alpha masks into their own Color Correct nodes. Also, the inverse of the spider beam (that Inverse node on the left) goes up into the “Darken Plate” we saw back there, making the whole plate… darker, except for what’s in the mask. This created an interesting lens-looking effect where the orange colored beam fades off to a light toned blue on the background right on the edge before going dark. Makes sense? Kind of hard to translate but easy to see in the video.
Now most of the work is done and we just need a couple final adjustments and passes.
First of them, adding glow to the spider’s eye. Using the matte pass, the eye is the only element with a red shader, so I shuffled it out onto a Constant, which allows me to choose the color for the glow (a bright orange this time). The Dilate and Blur nodes below the Glow are there to create a larger halo around the main light. Since it’s mostly visible in the beginning of the animation, I wanted it to make a good impression. Also (but obvious), since this is light information, it’s merged as a plus onto the main pipe.
For the depth pass I ended up adding the proxy geometry too, because I wanted my Nuke defocus to affect the original footage as well, not only the spider (which would’ve been quite weird). A small transition between the ledge on the right and the garage gate doesn’t match perfectly, so the Blur to this pass aims to hide this flaw. It would make the spider blurry too, but again I used the RGB matte pass to make sure the blur doesn’t affect our main character. Also, since this is an RGB channel, I had to use a Copy node to throw one of the channels into the Z.depth channel of the main data pipe, so ZDefocus could use it.
I feel this is the first time, since I discovered the ZDefocus node, that I’m NOT going too strong with it! Check the fluorescent lamp at the gate to see exactly what this is doing. It’s also affecting some of the foreground, but youtube compression is destroying that altogether.
One quick break before the motion blur: I’ve wrote about a lot of uses of this RGB matte pass but haven’t showed it yet, so here’s how it looks. It provides me with quick and different alpha channels within the same image based on the three colors, to control specific effects (mostly masks, I must add).
Back to the motion blur: this is a pass I’m not totally acquainted yet, it’s the first time we actually use it on an assignment on our own. I know it enough to make it work but every once in a while it breaks and affects the background, or doesn’t work at all, so more testing is required. Maya is outputting 2D motion vectors created by interpolating between each two frames. Since we knew from the beginning this pass would be used, we had to set ON for the Force Motion Vector Computation in the Performance tab of the Render Settings, otherwise our alpha channels would be all messed up, and most of the render passes wouldn’t align well with this data pass. In Nuke, the Copy node is getting this information and copying it into the mv2DNormRemap channel, which is used by the Motion Vector node (which is also very mysterious and works like witchcraft).
I had to take out the environment from this pass, otherwise I’d have double motion blur on the background, the real one, from the footage and the digital, created by Maya.
Finally, the final steps of the process, I have all this normal data and world position passes coming out of Maya in case I needed to relight anything inside of Nuke, but that wasn’t really necessary. It’s still here in case I decide to use it for quick fixes.
After that we bring back the Lens Distortion, taking the plate back to its original state and distorting all the rectilinear CG elements as a lens would do in real life.
I took a couple hours this week to clean my hard drive and found some files I had forgotten that were here, including a bunch of Vision Color’s top notch LUTs. This weird, fully black node is actually a Vectorfield node, which reads 3D LUTs and applies them to the image, as a color correct. I won’t go into what LUTs are or do, because I’m not sure of how to even start writing about this.
The trick here is you have to set your input and output colorspaces, otherwise it leads to odd-looking results instead of cool cinematic images. This was also interesting because it adds to the tools I can use to create the look of my demo reel, but this post is long enough I won’t write any further. I still have to experiment converting my footage to LOG, instead of eyeballing it, like I did this time.
Workflow development is another boring thing I really enjoy doing and testing.
Ok, I lied. Just a couple more lines: thanks to Miles, who made tracking possible (hahaha), Selman, who encouraged me to fix my jump animation instead of just ditching it because I already had the required number of frames, Cameron and Petar, both made very specific light-related comments that added a lot to the level of realism of the images and Daniela, Luka and Sean for pointing out a horrible sliding issue that was occurring in the previous versions. That’s it. Over.


You must be logged in to post a comment.