Monthly Archives:

January 2015

Anamorphic

Anamorphic on a Budget – Chapter VIA

January 1, 2015

< < BACK TO CHAPTER VI - THE PROCESS

VIA – CONCEPT DEVELOPMENT

Starting with Episode 01, it takes a lot of imagination on the actors behalf to put themselves into the context of this ruined environment that visually goes no further than the minds of the crew. In this sense, shooting with a digital camera allows for smaller and lighter gear, decreasing any distractions that might come from a large crew walking around and a noisy huge film camera. Besides, a lighter camera provides us with great mobility and versatility when setting up shots and capturing any improvisation or coverage that wasn’t planned on the call sheet.

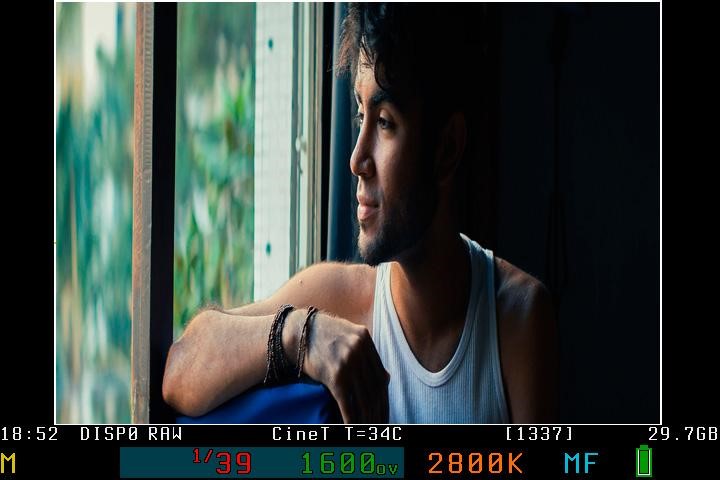
We planned to use Canon’s 5D Mark III for a number of reasons, but they were all dropped when the LOMOs were unable to cover the full frame sensor. We had to go with an APS-C sensor camera. The choice was Canon’s 50D and it’s quite an unusual choice because, even though it’s a strong camera, released in 2008, it wasn’t even supposed to record video.

The greatest feature about the 50D is, due to the enhancements provided by MagicLantern (better explained in Chapter 4 – MagicLantern), this camera was able to beat newer cameras in raw recording because it uses a Compact Flash card instead of the now-standard SD cards, which are much slower by comparison. Compact Flash cards achieve the best results for raw recording for their huge write speed.

Some of the visual and mood references we wanted to achieve through cinematography for Episode 01 come from the game The Last of Us (2013), and some of the jungle sequences from Hunger Games (2012). In both cases, lighting is absolutely realistic – the light is diffuse and doesn’t have so much contrast between the highlight and shadow areas.

As references for framing, our sources were the movies The Book of Eli (2010), I Am Legend (2007) and some sequences from The Road (2009), which make great use of dynamic compositions between background and forefround in order to create tension. A good example of this feeling is the first frame below, from The Book of Eli, where something is happening on the background but all the attention is focused on our character’s face at the foreground. At the same time, they compete visually and it’s hard to stay on his face for the whole shot, going to background and coming back to check his reaction. They complete each other in terms of meaning.


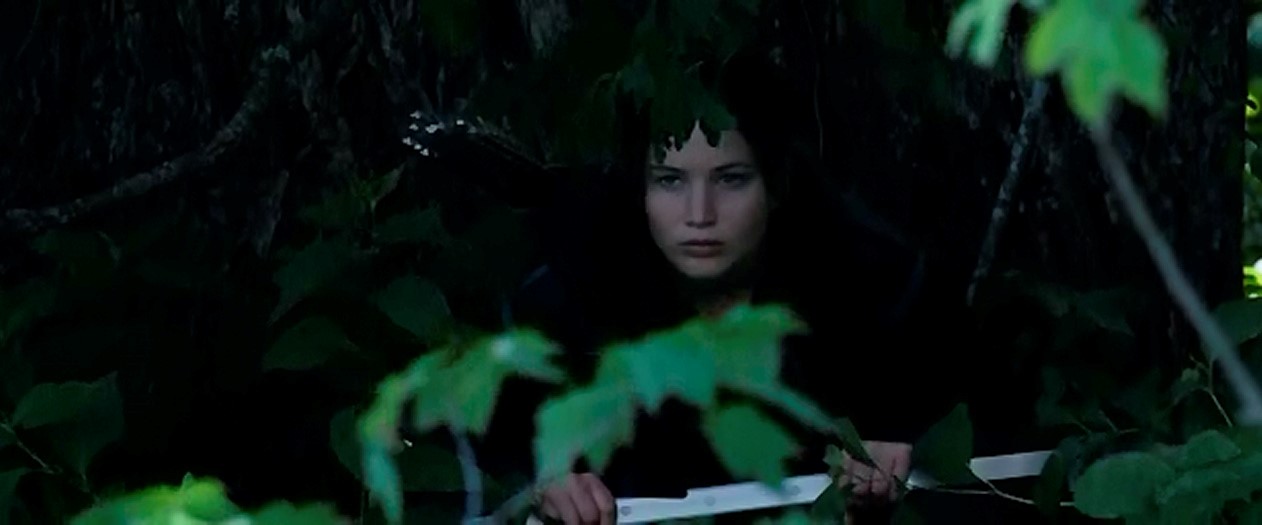
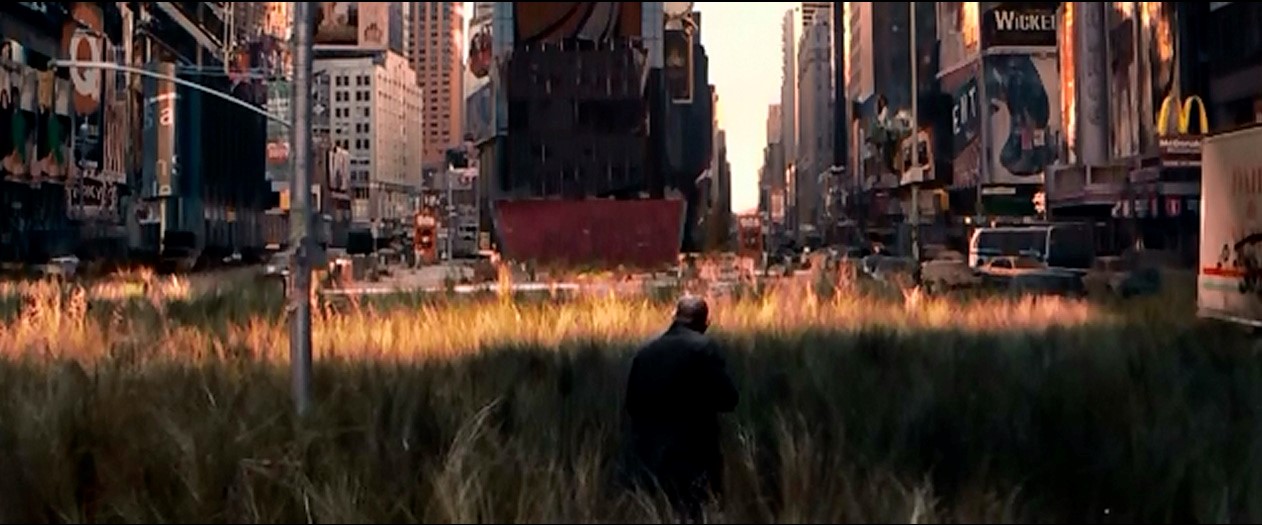
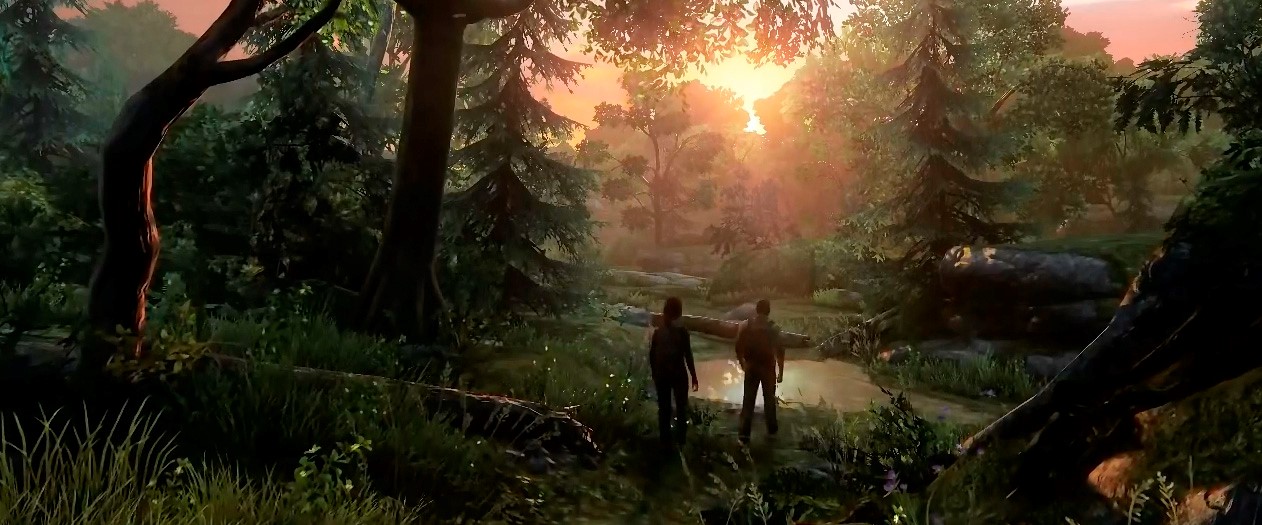
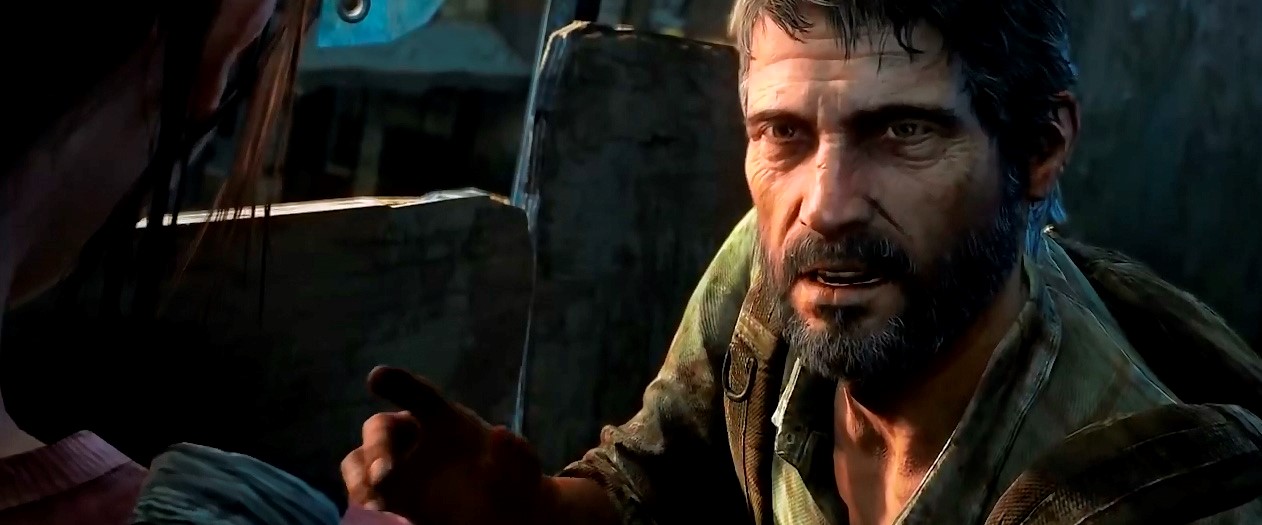
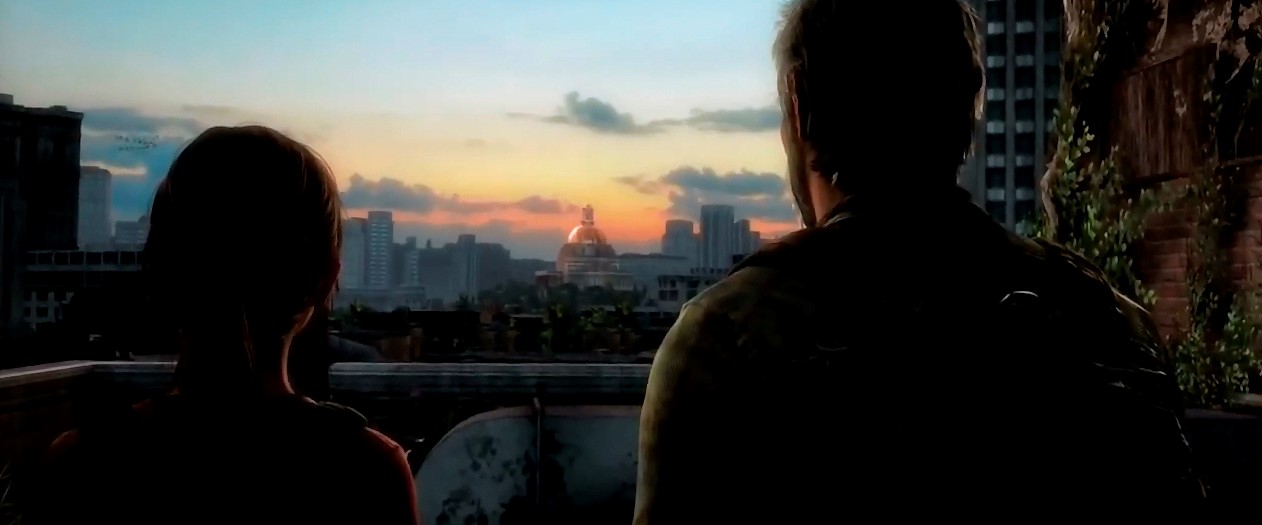
From top to bottom: The Book of Eli, Hunger Games, I Am Legend and three frames from the game The Last of Us.

Since each episode was shot entirely separate from the other, with a budget of only US$75 for each, we didn’t get any proper lighting gear of even electricity running on set. All of our light variations were based on the Sun’s position, carefully picked daytimes for each sequence and delicate handling of the raw files during post production.

The great brightness also allowed us to work at smaller apertures, bringing more information to the background of each shot, not only an indistinct blur, which helped visually in the sense of creating this world we had in mind, of a city abandoned by men and taken back by nature. We had to keep the camera running at lower ISOs since it didn’t handle noise all that well (we tried to be below ISO640 at all times, going above that only it was absolutely important) – the 50D is quite old already.

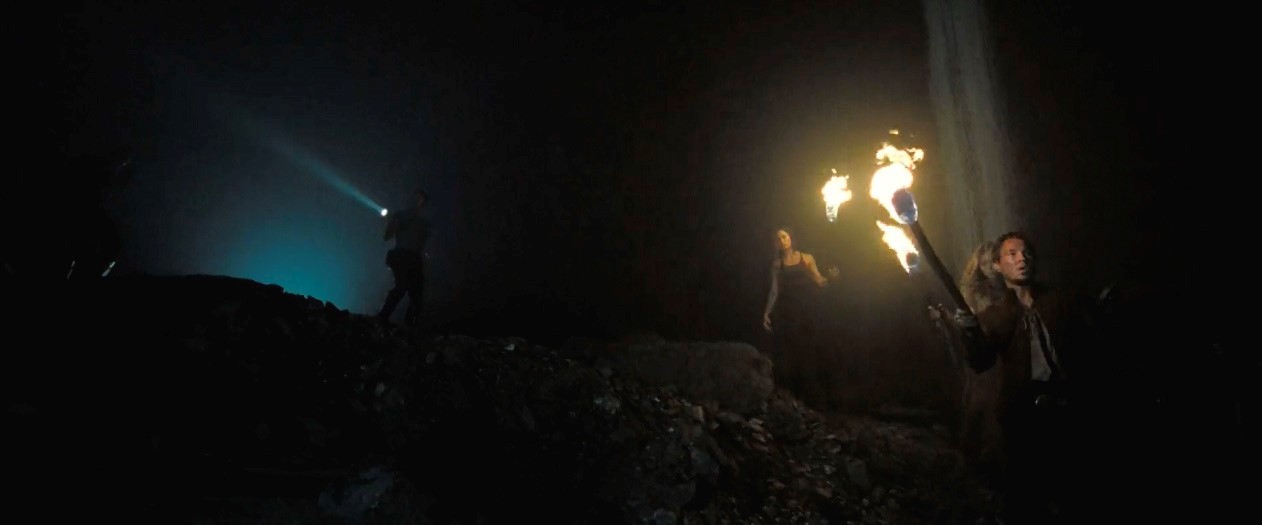
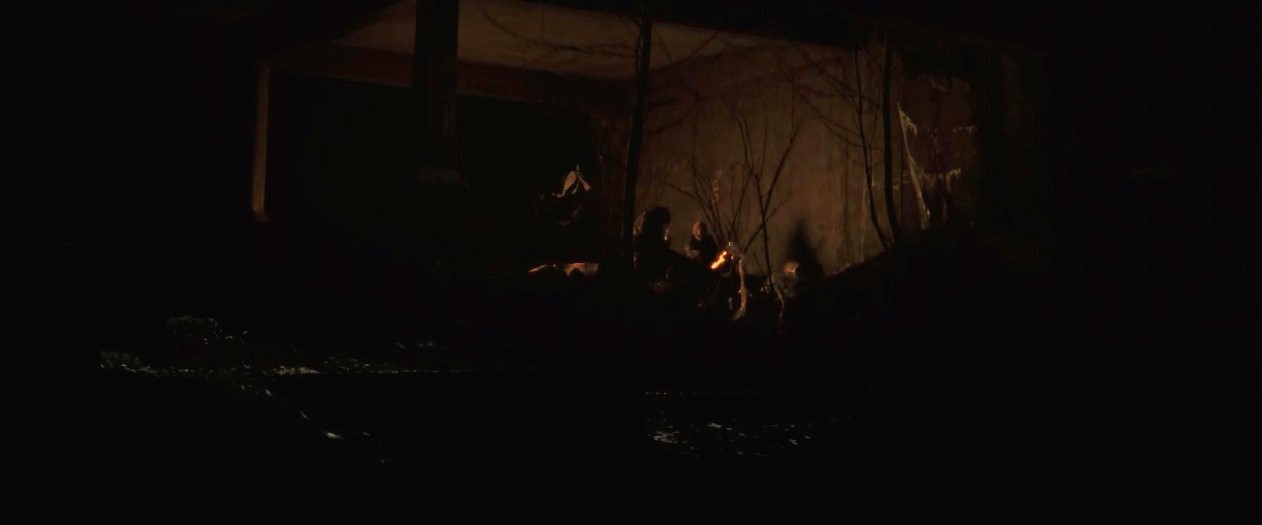
Episode 02 on the other hand plays at night, is dark and much more tense than the first part. Because of this, cinematography requires lots of contrast. Based on this, we had numerous practical lights on set – such as torches, a real diegetic campfire, and LED flashlights to create rimlights around the characters, representing moonlight. Since a lot of our lighting relied on real fire, I worked very closely with the art department to intensify or lessen the flames according to each shot, achieving a stylized look, still quite realistic, with great shadow areas in every composition.

In order to keep the camera feeling from the first episode, we didn’t use a single tripod or any other support gear but the shoulder mount, giving me freedom to try long camera moves as well as creating a constant camera shake which works well for tension and increases the realism feeling we wanted for the series, coming closer to a documentary shooting style.

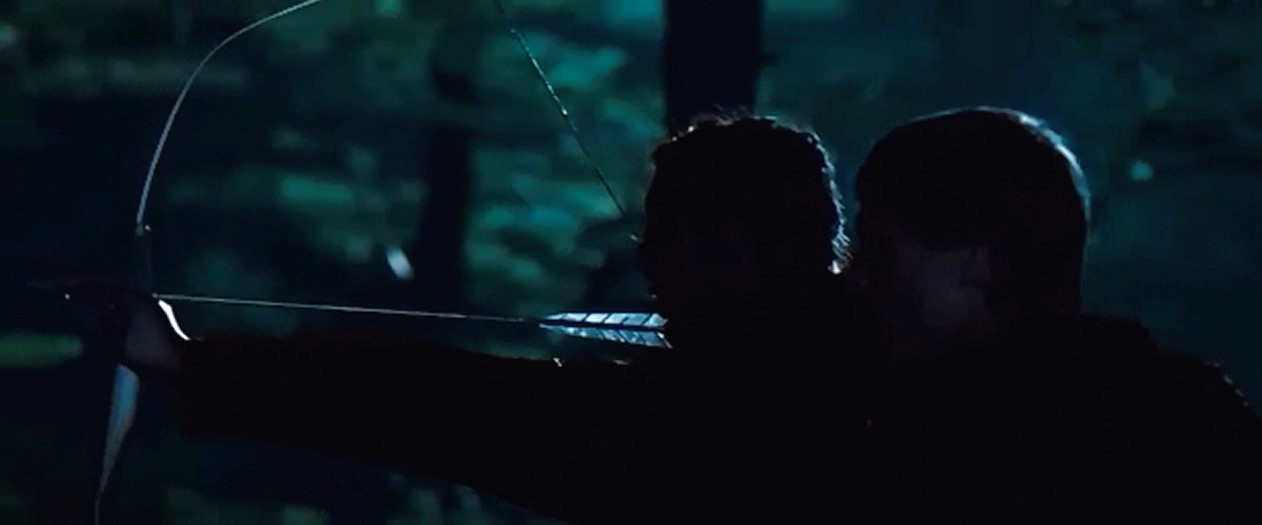
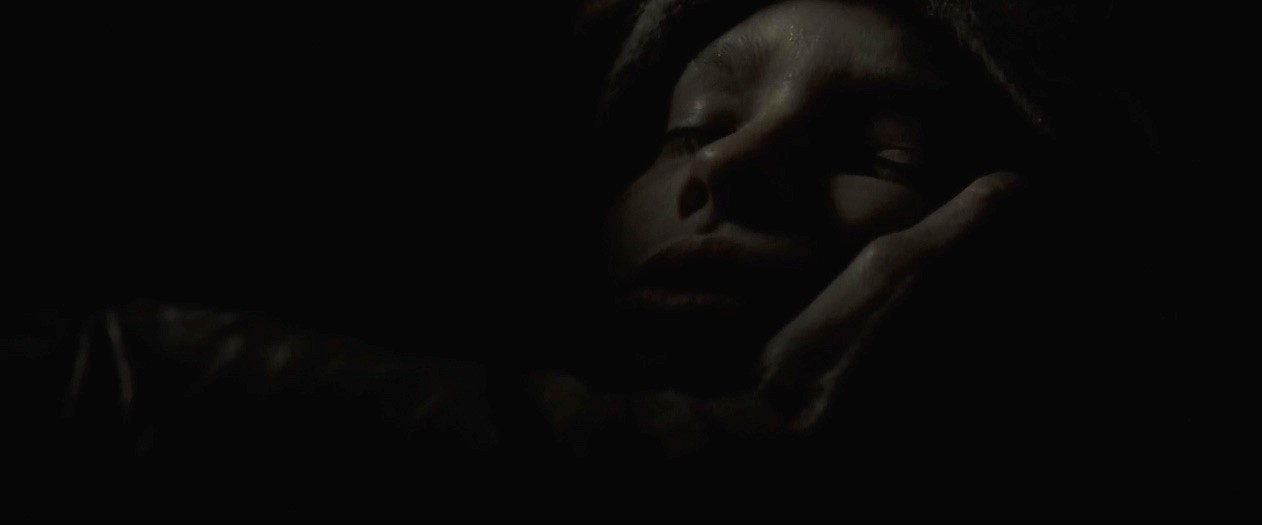
Episode 02 is strongly based on the relationship between the characters, which leads us to more close up shots and reactions than big camera movements or wide shots. With this approach we increase the tension about what’s around them at the same time we capture the essence of their acting and their point of view, by going so close.

Some of the references for framing, lighting and mood come from the movies Doomsday (2008), Hunger Games (2012) and, mainly, The Road (2009).


From top to bottom: Doomsday, two frames from Hunger Games, and three frames from The Road.

It’s not a joyous and colorful look but it brings a great complimentary color scheme between the strong orange from the flames and the blue moonlight taking turns between the most bright areas in the shot. In this regard, Episode 02 is the very opposite of Episode 01: no sunlight at all, it’s key lighting is a very warm campfire and most of the lighting is practical along with a couple flashlights so we can change framing quickly without moving light stands and such.

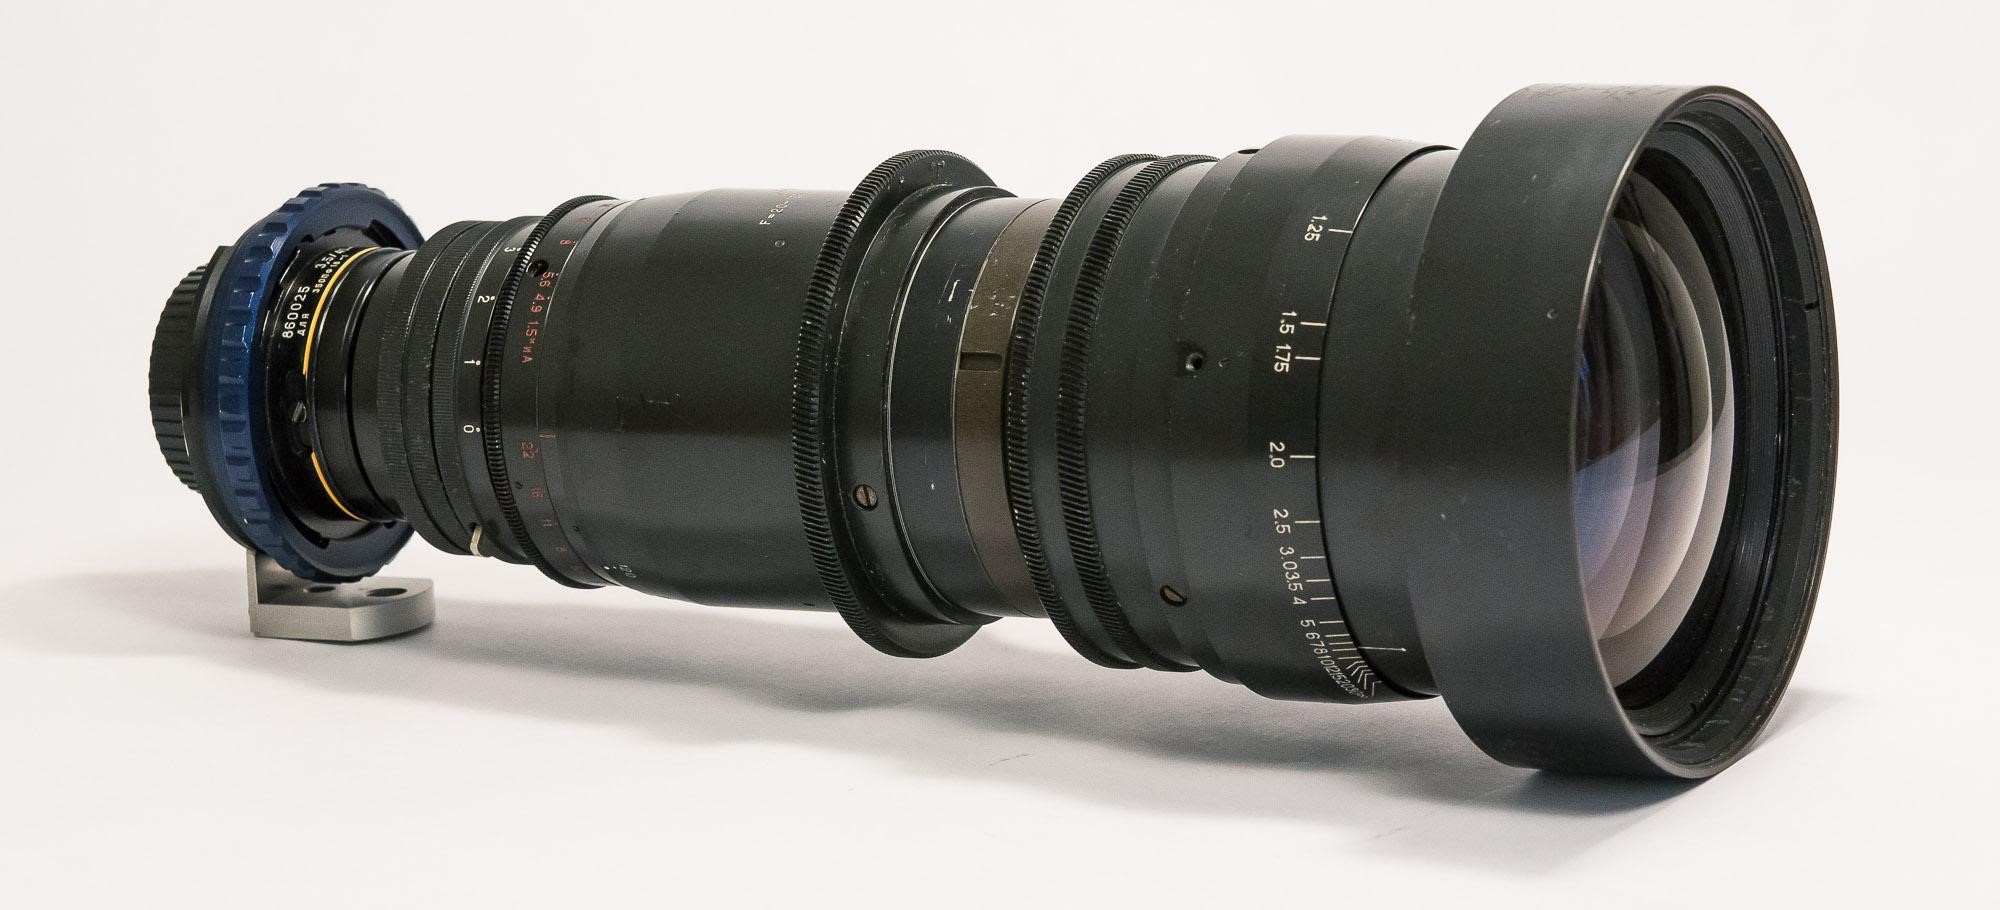
I’ve written about the lens choice for this episode on Chapter VB – Iscoramas, and fortunately we didn’t have any unpleasant surprises.

TO CHAPTER VIB – ON SET PREVIEW >>

Anamorphic

Anamorphic on a Budget – Chapter VI

January 1, 2015

< < BACK TO CHAPTER VB – ISCORAMAS – EPISODE 02

VI – THE PROCESS

This is the chapter where I’ll either curse and regret the idea of shooting anamorphic or swear I’ll never go back to standard 16:9. It’s a description of the path I chose to follow during shooting and post-production and its goal is to go beyond the theoretical – and historical – aspects of the lenses, going into detail of how they behave in production and what kind of impact it had on the camera crew, as well as the whole crew and the post-production step.

Changing the aspect ratio is something that concerns not only the cinematographer, but also calls for decisions from the director and the art department. We took the CinemaScope chapter out of David Bordwell’s Poetics of Cinema (2007) as our initial reference, where the author goes in detail over the complications created by anamorphic lenses when they first appeared in the movie industry and how, after some time and several attempts, Hollywood was able to embrace the new technology in a very positive way, adopting this aspect ratio even when the movies are shot with spherical glass.

One of the positive things about having a wider frame is being able to work with negative space – areas left empty on purpose – which, for example, in Episode 02, are majorly dark, increasing the feeling of not knowing what might be lurking behind the characters in that abandoned and destroyed city at night.

One of the first important things I did to shape the work was storyboarding with the proper aspect ratio, avoiding impossible compositions and physical issues when setting up the shots. This also got me used to the new frame size.

I’ll try not to go over repeating stuff, that happened in both episodes, writing about these aspects as a single event. If something is differs strongly between the two, then I’ll go into more details behing this difference and what kinds of consequences it brought to the end result.

TO CHAPTER VIA – CONCEPT DEVELOPMENT >>

Anamorphic

Anamorphic on a Budget – Chapter VB

January 1, 2015

< < BACK TO CHAPTER VA - LOMO - EPISODE 01

VB – ISCORAMAS – EPISODE 02

For the second episode, I went with the holy grail of anamorphic adapters, the Iscoramas. This decision was based on a key factor: their image quality and sharpness is excellent even at fast apertures like f/2 or f/2.8. Since my lighting scheme relies on very little and dim light sources, I must use fast lenses and the anamorphic quality mustn’t interfere on the shooting style, nor request radical changes.

In addition to the lenses, so we could impove image quality at low light, we decided to use Canon’s 5D Mark III, which has great performance in the lighting situation we would be facing – and this camera would also makr the total amount of gear smaller, as well as the crew.

One of the greatest advantages of modern cameras is the fact that you can adapt almost any type of lens and make it work perfectly. From that possibility, for shooting Episode 02 we used a small set of primes composed by 37mm f/2.8, 58mm f/2, 85mm f/2 and 135mm f/2.8, all of them made by Zenit, russian optical company, around the 1960s.


M42 mount russian lenses and Canon EF adapter.

One of the strong aspects of this set is the smoothness of their aperture ring, allowing changes during shots unnoticeably, like a cinema lens, and not like the traditional clicked stops from regular photography lenses, even more like the modern electronic ones. The fact that their optical design is so simple also improved the results of anamorphic pairing

We had three kinds of Iscos for shooting. The first one was an Original Iscorama, modified to allow closer focus. With it we could go from 1.2m up to infinity. The second was an Iscorama 54, much bigger and heavier, focusing from 2m to infinity, The third one, more of a backup lens, was an Isco Widescreen 2000, which has fixed focus and works as a focus-through adapter. We just took this one as a safety measure in case of extreme accidents or very risky shots. Ended up not using it at all.


Iscorama 54

The issue of focusing subjects closer than 1.2m was dealt with through the use of diopters. We had a trio of achromatic doublets with strengths of +0.4, +1.25 and +2, allowing us to change the lenses focusing distances according to the framing needs.

As a good bit of the episode goes around a campfire, we had to use the diopters in many many shots in order to achieve sharp focus on our characters and enhance flares and bokeh, not facing issues with any kind of shot, no matter the distance between the camera and our subject, specially for the close up shots.

The most important lens for this episode, the Original Iscorama, was in a race against time at a servicing facility in the USA. When I first bought this lens, it was in terrible shape, lots of scratches and terrible looking body. As soon as I had the chance I got in touch with John Stelten from Focal Point Lens, Iscorama expert and sent him the lens for servicing.

Under John’s watch, it went through polishing and recoating of the front element, which was the most damaged one and had a very negative impact on the resulting images. After it was fixed, the Iscorama was sent back to Brazil. This process took me good three months, but when considering the money and time spent on the lens, the result was definitely worth it. Here’s a couple of pictures from before and after servicing.


The lack of contrast and the huge halos around light sources were caused by damage to the front element.


After polishing, things went back to normal.


Just looking at the lens, you can understand why the picture looked so bad.


After polishing, only a faint scratch remained.

TO CHAPTER VI – THE PROCESS >>

Anamorphic

Anamorphic on a Budget – Chapter VA

January 1, 2015

< < BACK TO CHAPTER V - ZONA SSP

VA – LOMO – EPISODE 01

Episode 01 is a very bright chapter, with lots of sunlight, exterior shots and well-lit environments. Taking advantage of all this available light, we went with LOMOs, real cinema lenses, but that require lots of light for optimal performance. The plan was to start early and shoot until sunset so we didn’t waste one single precious light moment. LOMOs bring a low-contrast look and very distinct from any other optics I’ve came across so far. When comparing the results, I think the first chapter is way more cinematic than the second and a great deal of this feeling comes from the lenses character.

After the whole crew agreed to go anamorphic I started doing real tests using an OCT-19 (LOMO’s mount) to EF adapter. The first problem came up where I wouldn’t expect it: sensor coverage. Since these are cine lenses, they’re designed for 35mm film, without much extra image falling to the sides. As the 5D Mark III has a full frame sensor – almost double the size of 35mm film – the lenses just projected images on the central part of the sensor, creating huge black edges around that area.


OCT-19 to Canon EF adapter.


Canon 5D Mark III + LOMO Foton-A, 37mm (the inside of the lens shows up in the frame).


Canon 5D Mark III + LOMO Foton-A, 140mm (still shows heavy vignetting)

These black edges were way heavier than what I was ready to commit, so I decided to swap to a camera with a proper sensor size. The chosen one was the Canon 50D, released in 2008, quite cheap on the used market. Its sensor is almost exactly the same dimensions as a 35mm film frame. Through MagicLantern and raw recording we were able to set a 4:3 recording window that, when stretched back to the correct values would give us a 2.66:1 aspect ratio.

After picking the camera – and solving the vignetting issue – it was time to grab the lenses and go for real-world testing. Opposed to the various fast taking lenses used in Episode 02, here I used only two big anamorphic zooms, manufactured twenty years apart.

The oldest one, made in 1969, is a LOMO Foton-A 37-140mm T/4.4. It’s not a fast lens, but its large zoom range allows for very distinct framings. The anamorphic block goes in front of the spherical lens and focus is synchronized between both through bolts and screws that hold both pieces together.


LOMO Foton-A 37-140mm T/4.4

Minimum focus sits 1.6m away, but we also had a +1 diopter available, made specifically for this lens which solved focusing issues in tight spaces and close ups, increasing the anamorphic bokeh as a bonus.

Buying, modding, servicing and shipping this lens could be a movie on its own, going through Lithuania, Ukraine, Spain and finally Brazil, over a time span of five months – between March and August of 2013.

For the first step, I needed to provide the seller a bunch of hand written documents assuring him I would be responsible for any problems with shipping the package to an address that wasn’t my default address. That was a key part of the route, making it cross the border to Ukraine in order to reach Olex’s very capable hands.

Once delivered, Olex swapped the original OCT-18 mount to OCT-19, declicked the aperture ring, installed standard focus and zoom gears, serviced both spherical and anamorphic blocks separately and then together. He also improved the connection between both blocks and developed a new support system for 15mm rails instead of the russian Konvas stanrdard. After all this was done, the lens waited around his office while I looked for someone going through Europe and then returning to Brazil that could bring the briefcase along safely. My sister did that.

The second lens, much newer, made in 1989, goes for the name of 35OPF18-1, and covers focal range between 20mm and 120mm, with a T/3 aperture, which is considerably faster than its older sister. This lens uses a rear anamorphic adapter, which kills every beautiful imperfection introduced by the bent glass (flares and bokeh, mostly), keeping only the stretch.


LOMO 35OPF18-1 20-120mm T/3

The acronym OPF in russian stands for “lens with variable focal length”, which means it’s a zoom lens. This 20-120mm in particular is an identical copy of a Cooke lens design, but made in the Soviet Union.

One of its unique features is a macro ring embedded at the back of the lens, with strength from 1 to 5, 1 being standard operation, without any macro capabilities. As the strength increases, the maximum focusing distance becomes shorter and shorter, killing the need for any diopters and allowing sharp focus less than one inch away from the front glass (I was able to focus on my fingerprint touching the glass).

TO CHAPTER VB – ISCORAMAS – EPISODE 02 >>

Anamorphic

Anamorphic on a Budget – Chapter V

January 1, 2015

< < BACK TO CHAPTER IVA - CUSTOM CROPMARKS

V – ZONA SSP

Zona SSP started out as a webseries project for a random class in which I was able to experiment with everything we’re not usually encouraged to do at the traditional film production classes. I wrote and directed both episodes. Besides that, I was also the cinematographer, editor and responsible for all post-production (both sound and visual). My goal was not to pile up responsibility and create a “single-man” product, but since I wasn’t able to find proper teammates to cover these roles in time, that’s what ended up happening.

The series idea is to portrait a dystopic future in Brazil, using the simplest and cheapest tricks available, without letting the audience notice that it was an extremely cheap film. At this stage I was glad I could heavily rely on our very skilled art director, Luciana Parelho. Our actors, Lucas Durão and Larissa Orlow also jumped in without restrictions along with other classmates. The full crew amounted less than ten people. Fortunately we had a good deal of time for pre-production in order to get the script right, storyboards, visual references and to develop strong visual and sound concepts for the series.

Since the whole thing was a huge experiment, I proposed we used anamorphic lenses in order to test them through production pacing. At this point of the year, we had student strikes going on and the other films I would work as director of photography had great chance of not happening at all.

Episode 01 is based entirely around daylight and exterior shots, relying exclusively on sunlight and various locations. Episode 02, on the other hand, was shot almost in a single room, at night, and has a much more tense feel to it because of the relationship between the characters. The lenses played a great part in how each episode would look, in order to achieve a much more “cinematic” feel rather than “TVish” or “web”.

We spent around $150 to shoot both episodes (thanks to a lot of friends who borrowed us gear, wardrobe, accessories and valuable advice) and I feel pretty proud of what we got at the end. All the editing and post-production – including reshoots of missing or problematic footage and the music score – took us two months, which is also a very short turnaround when we take into account that these are 7-minute videos.

In order to broaden the experience, I wanted to use different kinds of lenses for each episode so I could better describe the process here. This change of lenses also introduced a big change in gear, but we’ll get to that later.

The main reason for wanting to change lenses was the ability to compare the workflow in each scenario, from the camera crew’s functions up to “format’s specific needs” and on-set handling. Besides all that, it’s always nice to be able to compare how they perform, visually, using the final product.

For Episode 02, since we had a low light environment and needed to work at wider apertures, I decided to go with the Original Iscorama as well as an Iscorama 54 paired with M42 russian taking lenses. For Episode 01, which is day-based and has lots of bright sunlight I went with real cinema lenses, even though not as fast as the Iscoramas: OCT-19 mount LOMOs. Both systems will be described in detail over the following chapters.


M42 taking lenses and Iscoramas lined up for Episode 02

TO CHAPTER VA – LOMO – EPISODE 01 >>

Anamorphic

Anamorphic on a Budget – Chapter IVA

January 1, 2015

< < BACK TO CHAPTER IV – MAGICLANTERN RAW

IVA – CUSTOM CROPMARKS

MagicLantern’s first use when combined with anamorphic lenses was the design of custom cropmarks. These are drawings that are placed on top of the image that is being shot, which allow previewing a different frame format than the one that is actually being shot (for example, I can have black bars covering top and bottom of the frame in order to make it look more cinematic).

Since mixing stretch factors in the same video is a common thing (use a 1.33x stretch lens for some shots and a 1.5x or 2x stretch for others) we know that something is gonna be cropped off later (either top-bottom or left-right of the frame). From here, I created nine unique cropmarks that allow mixing any kind of lenses (from spherical to 2x) always showing what’s the core framing and what will be cropped.


4:3 cropmarks for 2x stretch lenses

File names look like some sort of code, but they make sense: the first value is the final aspect ratio, according to the lens stretch. 1.33x stretch results in 2.4:1, 1.5x equals 2.66:1 and the monstrous 2x goes as wide as 3.56:1. The second part of the file name is for the kind of lens being used. Let’s say my whole project was shot with 2x stretch and I’m going for the 3.56:1 aspect ratio. After principal photography is done, I have to shoot some extra footage using normal spherical lenses. In this case, I need to pick the “2x-norm” cropmark. This bunch of numbers is quite confusing, so the image sequence below tries to make it easier to see and understand.


Standard framing on the camera’s LCD, shows everything that’s being shot.


1.5x cropmark on top of the image so you can compose your shot.


Final framing, cropped during post-production.

Later on, cropmarks were extremely useful while setting up my raw recording window. As not everything that shows on the LCD is being recorded, I drew new cropmarks, specific to each project, allowing me to frame only what I’m shooting.

JANUARY 2015 – MagicLantern’s latest versions already have a box drawn around the capture area for raw recording. This was at the very release of this feature.

In October 2012, MagicLantern released a new alpha version for the Canon 5D Mark III, adding a series of new features, among which we can find a fix for better previewing anamorphic lenses through an automatic “squeeze” of the LiveView image in order to display the corrected aspect ratio based on the lens stretch factor. This feature provides great results but eats a lot of processing power from the camera. Its only flaw is the fact that it doesn’t work when you’re reviewing your clips in Play Mode. Developers informed me that messing around with Play Mode is quite complex and risky.


Camera’s LCD with the Anamorphic feature turned on.

TO CHAPTER V – ZONA SSP >>

Anamorphic

Anamorphic on a Budget – Chapter IV

January 1, 2015

< < BACK TO CHAPTER IIIH - FAKING THE LOOK

IV – MAGICLANTERN RAW

MagicLantern is an alternate software that runs on top of many Canon DSLR’s firmware. A group of hackers and programmers started to study Canon’s source code around 2009 and quickly achieved some advantages over the original firmware. From 2009 to 2013, the number of developers and users increased a lot, as well as the available – and stable – new functions.

But how does it work? Following web’s legal course, all the code used has been written from scratch and is open for anyone willing to take a peek, study it or implement changes. The developers avoid using Canon’s functions because that is proprietary code – which could render them piracy lawsuits. What’s being used is actually tweaks and tests involving the DIGIC processors – more than usual by trial and error – which evolve into custom features.

The software is free for anyone and can be download from its official website. It’s always good to remember that even though the software goes through heavy testing, there’s always a good chance of coming across bugs or weird behaviour from the camera, due to MagicLantern’s use. Canon’s warranty doesn’t cover gear damaged by third party software (there are no records of any permanent damage so far).

On the sofware’s website one can find a list with all compatible cameras and the features enabled on each and every one of them. You can find the latest stable version for download, as well as test versions for some models and even less stable versions including the day-to-day changes from various developers. One of the greatest achievements in this group is that anyone can contribute: suggestions, tests, logs created by the cameras or even coded functions. Everything is read and replied very quickly by an amazing team which doesn’t get a dime from this project.

By May 15th, 2013, MagicLantern’s developers enabled raw video recording in Canon DSLRs. Not every camera can handle it or create decent results and much of the performance relies on fast memory cards, but this is an amazing achievement, providing us with a feature that was only possible through professional grade cameras, through huge costs with purchase or rent.

From this day on I ran extensive experiments through short projects and stress tests to evaluate if this new feature was stable enough to go through a standard short-film production workflow. All the testing was very rewarding and the image quality boost is huge when compared to the camera’s original video codecs, even though now we’re eating through cards like there’s no tomorrow.

The goal with raw video is to store the maximum amount of information within the frame, allowing for more creative manipulation during post-production. The image look straight out of the camera is dull, flat, sometimes soft and lacks character. From there, the cinematographer can use all the light and color information stored on the clips to tweak it and stylize it until the image reaches the desired final look. Raw recording allows the merging of the latent image potential with the creativity of the person working on it.

The common ground between shooting raw and using anamorphic lenses is the ability to pick a non-standard “recording window” from the camera’s sensor area. This way, when using 2x stretch lenses, I don’t need to end up with a 3.56:1 (16:9 x 2) aspect ratio. If I set a recording window to something around 4:3, the final output is 2.66:1, slightly longer than the standard CinemaScope.


Shooting with a shorter aspect ratio than 16:9 you also avoid wasting footage that would be shot on the sides of the frame and immediately discarded in post-production (crop), which also saves you some file space.

TO CHAPTER IVA – CUSTOM CROPMARKS >>