
Use Photoshop’s Spherize filter to fix the uneven stretch noticeable in some anamorphic adapters. Also, how to export an image sequence from Premiere, record an action in Photoshop, run it on a batch of images and re-import back into Premiere.
USEFUL LINKS:
- Use the Anamorphic Mumps Corrector for a more straightforward workflow!
- Learn what anamorphic mumps are
- Adobe Creative Cloud
All the RED links on this post are part of eBay’s Partner Network, so if you purchase anything through them, you’re helping me to keep this project going.
You can support this project on Patreon. Make your contribution and help the Anamorphic Cookbook!
Mumps are that weird looking stretch that you get sometimes, when some parts of the frame look overstretched – mainly the center – and the edges still look compressed. You don’t necessarily have both things at the same time, it’s usually one or the other. Back in the first days of anamorphic in Hollywood, many actors and actresses included clauses against anamorphic lenses in their contracts for these lenses rendered unflattering images of themselves because of mumps! If you wanna know more about the subject, check Chapter IIIC of the Anamorphic on a Budget. This bizarre effect is due to the cylindrical glass of the anamorphics which isn’t even across its width, resulting in an uneven stretch across the frame.
Here’s a shot with a case of mumps and here’s the same shot, fixed. So let’s get to work. Start by firing up Photoshop and bringing in your messed up frame. Now go to “Filters”, “Distort”, “Spherize”.

On Spherize’s pop-up window, you can distort things. The default mode will make you worry if this filter is actually any good, but when you change it to Horizontal, you’ll see its power. You can go with either positive or negative values. Positive will grow the image from the center, which is the opposite of what we want, and negative numbers will pinch the image towards the center, making the edges more stretched and compressing the center – the most important part here is that it doesn’t change the width of the file. This process involves a lot of guessing if you don’t have a reference, like a circular object in the center of the frame. The good thing is, even if you guess wrong, it’ll still look better than the original! When you’re done just press “OK”.

Save your fixed frame. Yay! Now repeat the process for the next five hundred frames in this shot! Sounds painful, right?
On the next few minutes I’ll explain how to convert a video file into an image sequence using Premiere, then we’ll record a Photoshop action, run the action on a batch of images automatically and re-import them back into Premiere.
In Premiere, create a New Sequence using your shot and then export it by either going through the menus “File”, “Export”, “Media” or pressing Ctrl + M. On the Export window we’re gonna change the encoding settings to an image sequence. On “Format” you can go with Targa or PNGs for no or little loss of information but rather big files, or just JPEGs for lighter files and heavier compression. Since this video is going to YouTube, I’ll go with JPEGs, but if it were 4k for a feature film, I’d choose a lossless format such as Targa.


Choose the destination of the rendered files and hit “Export”. Let it process.
Back in Photoshop, open the Actions menu – “Window”, “Actions” -, create a new action – I’ll name it “Fix Mumps” – and set it to Record by pressing the small red circle. Now open your first frame, apply the Spherize filter – tweak the settings until it looks right -, save the file in a new folder – mine is the shot name + fixed – and close the image. Hit Stop to finish recording the action.

Now on the “File” menu, go down to “Automate” and then “Batch”. On the Batch window, select “Fix Mumps” from the “Action” dropdown, leave the “Source” as Folder and click “Choose…” to navigate to the destination you exported your frames. Check the “Override Action ‘Open’ Commands” and “Suppress File Open Dialogs” so you don’t have to click something every time you open an image. Now on the “Destination” side, it’s also a Folder, and you get to choose it. I’ll use the same folder I just created, with the shot name + fixed. Tick “Override Action ‘Save As’ Commands”. For the file naming section, in the first line, set it to “None”, name the shot, second line, just for organization matters, “None” again and I’ll add a _fixed_ suffix. Then, on the third line, from the dropdown pick 4 Digit Serial Number, then input your starting serial number down there, in case it starts at a value different than 1. On the fourth line, add the extension.
Click “Ok” and let your computer think for a little while. Photoshop is gonna flicker a little bit while it runs the process on all the frames and saves them to a new destination.

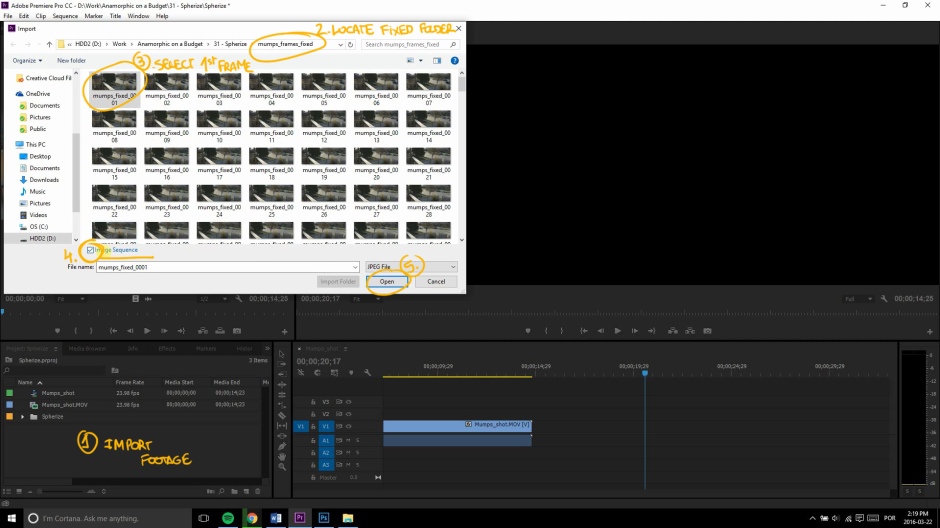
After that’s done, we’re back on Premiere: in the Import window, go to the folder with the new frames and select the first one, then check the box that says “Image Sequence” and hit “Ok” and that’s done! If it has a weird frame rate, right click on it at the Media Bin, go to “Modify”, “Interpret Footage” and input your frame rate manually.
Ok, that ran a little longer than I planned for. Again, I hope this is a useful tool now added to your skill set. Subscribe to the channel for new videos and check my blog for all the cool anamorphic content. I’m Tito Ferradans and I’ll see you soon! BUY THE SHIRT!