
Following up on the previous video, here’s how to do your own custom mod of the Helios 44-2. Feel free to shoot questions on the comments below.
USEFUL LINKS:
- Get a Helios 44-2 eBay
- Check if I’m selling any modded lenses on eBay!
- Get a lens wrench on eBay
- Get oval aperture discs on eBay
- Buy focus gears on eBay
- Victor Danell’s modded Helios 44-2
- Download the PDF for the oval laser cuts
- Combine this technique with a flare filter for a complete anamorfake look
- Watch my review on DSO’s FlareFactory58
All the RED links on this post are part of eBay’s Partner Network, so if you purchase anything through them, you’re helping me to keep this project going.
You can support this project on Patreon. Make your contribution and help the Anamorphic Cookbook!
Besides that, I still have some available for sale, because I need to recoup the money spent in this tutorial (three Helios lenses, cans of spray, oval apertures, polish). Get your own righ here on eBay!
Tito Ferradans here for a lengthy video involving some serious modding and unique looks. Summer is here and DIY projects are up. A few weeks ago I was blown away by a few photos posted by one Victor Danell with a modified Helios 44. His process was to “polish” the glass elements with a strong abrasive and sand the inside of the barrel in order to increase how light bounces around. The resulting effect is a light and wonderful glow to the brighter areas of the frame. It’s an effect I was trying to re-create in post since forever and having the opportunity to do it in-camera was just too much to resist. Then I pushed the concept a bit further, painted some things inside the lens, replaced the aperture and added a flare filter inside the lens as well.
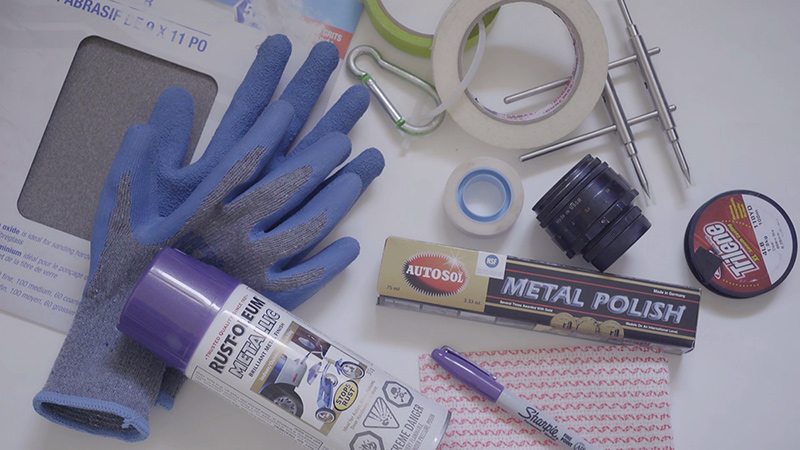
What are you gonna need for this process: a lens wrench, Helios 44-2, metal polish (I used Autosol, following Danell’s instructions), a piece of cloth, some sandpaper (I used 100 because I did the whole thing by hand), masking tape, a can of metal paint, transparent tape, sharpie markers and thin fishing line. I highly recommend you take photos along the process so you know what goes where and to be able to put the lens back together. There are a couple of videos around on how to disassemble and clean the Helios, so this isn’t one of them. I didn’t fully disassemble the lens, just took out the minimum I could.

Starting by the back, unscrew the rear group. Now the front. The inside of the barrel has a slot for the lens wrench, so twist it out. The front is much easier than the back. Once the ring is removed, the element pops right out. Place it on the desk. Give the lens a gentle shake and the second element will also fall on your hand with a spacer. Onto the back group, unscrew the glass out. If you’re having trouble with grip, use rubber gloves! Now get the piece of cloth, add some metal polish to it and uncoat it all away. This process creates countless micro scratches on the glass which are the main cause for the glow since light bounces through them. To completely remove the polish I washed everything in water, dried and let it dry some more on its own.
![]()
![]()

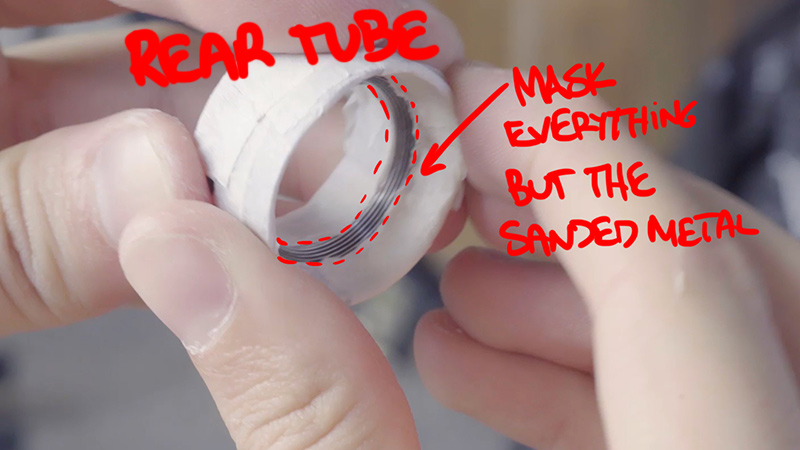
In the mean time I went outside with the rear (now empty) tubing and the front spacer. Wear mask and protective goggles. Using rough sandpaper (100), take out the black paint inside these two pieces. It doesn’t have to be perfect. With the masking tape, cut small pieces enough to cover ALL the threads and just leave the sanded metal exposed. Be very thorough and add many layers in the process because the paint will mess up the threads if it gets there. Now, spray it with your favorite color. Here I’m making a purple one. Make sure you get a decent amount of paint in there. When it dries off you can remove all the masking tape. The glass should be dry by now, so it’s time to start putting it back together. The painted elements will reflect on the light that bounces inside of the lens, adding a bit of a color tinge to the flares and glow.
![]()
Starting with the front, put back the inner glass element, then the painted spacer, front element and screw it tightly back. Reassemble the back in the same way, but don’t fit it in yet. Time to do the oval iris. I had the acrylic disks from the previous tutorial, so I just grabbed one of those. You can choose your aperture value, I’m going with f/2.8 here. Sand it down as thin as you can and be careful not to break it. With the sharpie, paint the disk. I’m going for a crazy look, so I’m gonna use the same color I used for the inside of the lens – purple. This is VERY intense, if you just want oval shapes, paint it black. The tinted aperture has a very strong effect whenever you have a direct light source in the frame, or light rays going straight inside the lens.
UPDATE – OCTOBER 2016: I’m selling aperture discs for this mod on a small scale on eBay, so if you’re looking to get some for a decent price, check out the listing!
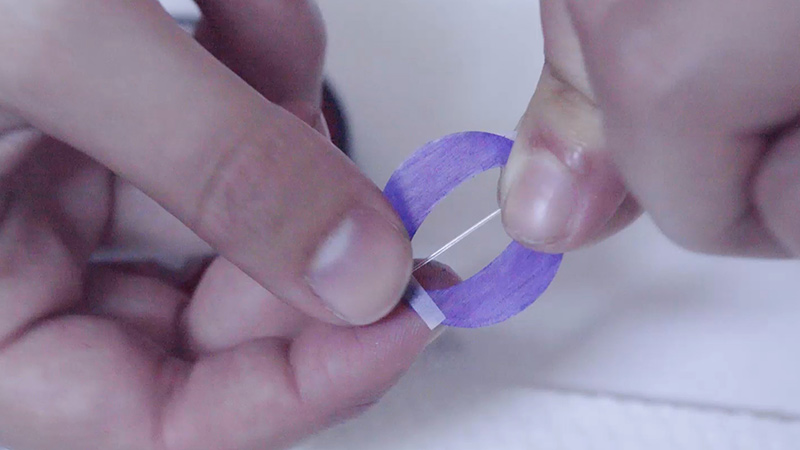

The last step is to attach the fishing line as a flare filter. Put it across the middle and using thin transparent tape, lock it into place. Cut the edges. To make this an unquestionably purple lens, I’m gonna paint it as well. Careful because neither the wire nor the aperture will ever fully dry. Putting the oval with the right orientation can be challenging. I noticed the gap in the EF adapter is always perpendicular to the top of the lens, so I used the as a guide. The easiest way to rotate it in place is using the lens wrench. It still takes a few attempts and sometimes screwing the back element rotates the iris, so take that into account. Screw the back in as tight as you can and be careful not to break the acrylic disk (you’ll feel some resistance). The amber one got a few cracks in this process.
That’s it! You’re done! Now’s the perfect moment to subscribe to the channel and check the blog for plenty of other tutorials and reviews. Ferradans out.
UPDATE: If you like this look but not exactly this build, there’s a much more guaranteed way to get a buffed up Helios with LOTS of customization from people who actually know what they’re doing: the FlareFactory58 and the TRUMPs, made by Richard Gale at DogSchidtOptiks. I reviewed them a few months back and I still dream about it. There you even have the option of getting optical attachments so your custom Helios turns into a full set of 38, 58 and 88mm.


[…] folks, Tito Ferradans here for another Chop Shop. Playing with the Helios was cool, but as any of you anamorphic users out there know, the true challenge with scopes is getting real […]
[…] probably remember a few months ago when I posted an extreme tutorial on modifying the Helios 44-2 for crazy looks. It was actually a series of simple operations that involved sanding, polishing and painting parts […]
[…] Anamorphic Chop Shop – Helios 44 Extreme Modding […]
[…] About the author: Tito Ferradans is a Cinematographer, VFX artist and anamorphic enthusiast currently living in Vancouver, Canada. You can find more tutorials, tips, and videos of his by checking out his website, Instagram, or YouTube channel. This post was also published here. […]
[…] Concerning the writer: Tito Ferradans is a Cinematographer, VFX artist and anamorphic fanatic presently dwelling in Vancouver, Canada. You will discover extra tutorials, ideas, and movies of his by trying out his website, Instagram, or YouTube channel. This submit was additionally revealed here. […]